

Currently Panopto Capture is supported in Google Chrome, Microsoft Edge, Firefox, and Safari (version 15 or above only) browsers on Windows 10, MacOS 10.15 or higher, or the latest ChromeOS.
Panopto plans to provide support for Android mobile device browsers in the future.
Note: Please make sure exceptions are made for audio (microphone), video (web camera), and screen in your preferred browser.
Getting Started with Panopto Capture
Panopto Capture allows you to easily record audio, video, and screens or individual applications. You can access Panopto Capture in your browser directly within Canvas or at brown.hosted.panopto.com instead of downloading the Panopto Personal Capture desktop application.
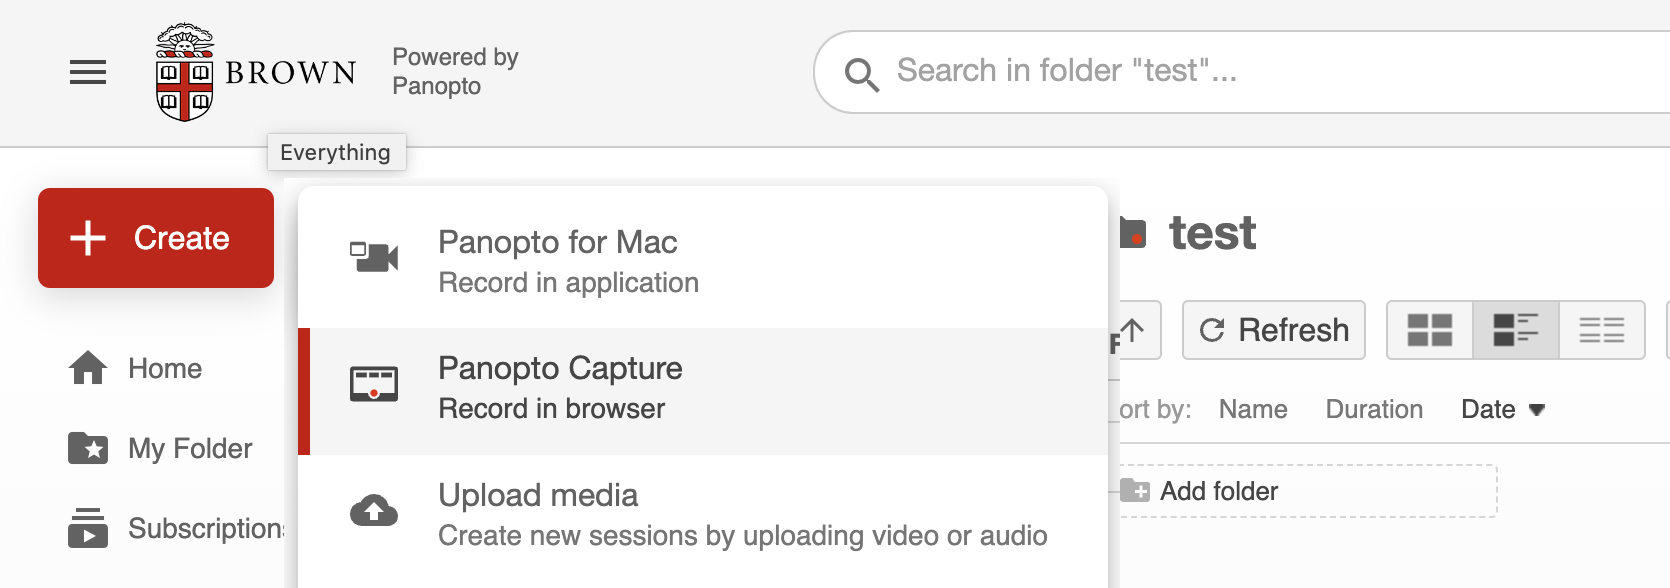
1. How to Open Panopto Capture
1. Navigate to your course Canvas Media Library or the direct folder on the Brown Panopto site you want your video to record to.
Click on the Create button and then select Panopto Capture
Media Library in Canvas

brown.hosted.panopto.com
2. Panopto Capture will launch in a new browser tab.
Note: You may be prompted by your browser to give Panopto Capture access to your camera and microphone.
2. Selecting a Camera
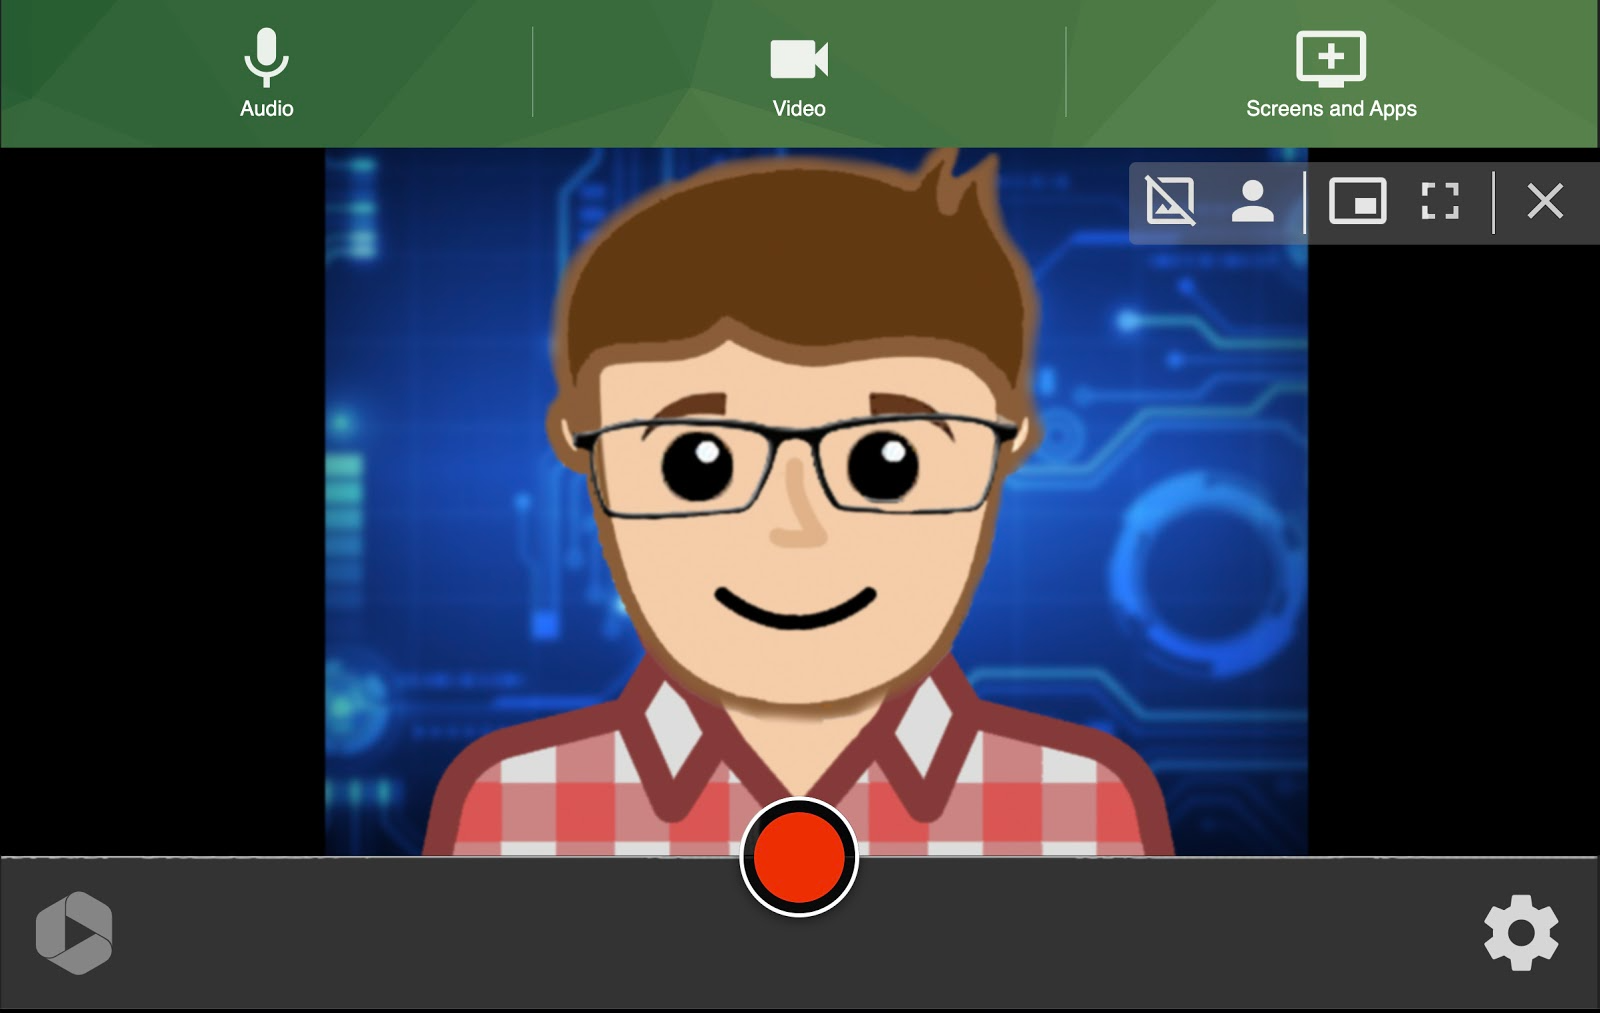
1. Panopto Capture should auto detect the built in or default camera . If you want to use a different camera such as a USB connected webcam, select the camera icon from the top toolbar.

2. Any detected cameras that are connected to your computer will appear and show a preview. Select the desired camera(s) and a checkmark will appear over the preview
Note: The first camera selected (automatically or manually) will be used as the primary video source. Secondary cameras will appear with the option to either switch to them for the recording, or to add them in as a secondary video source.
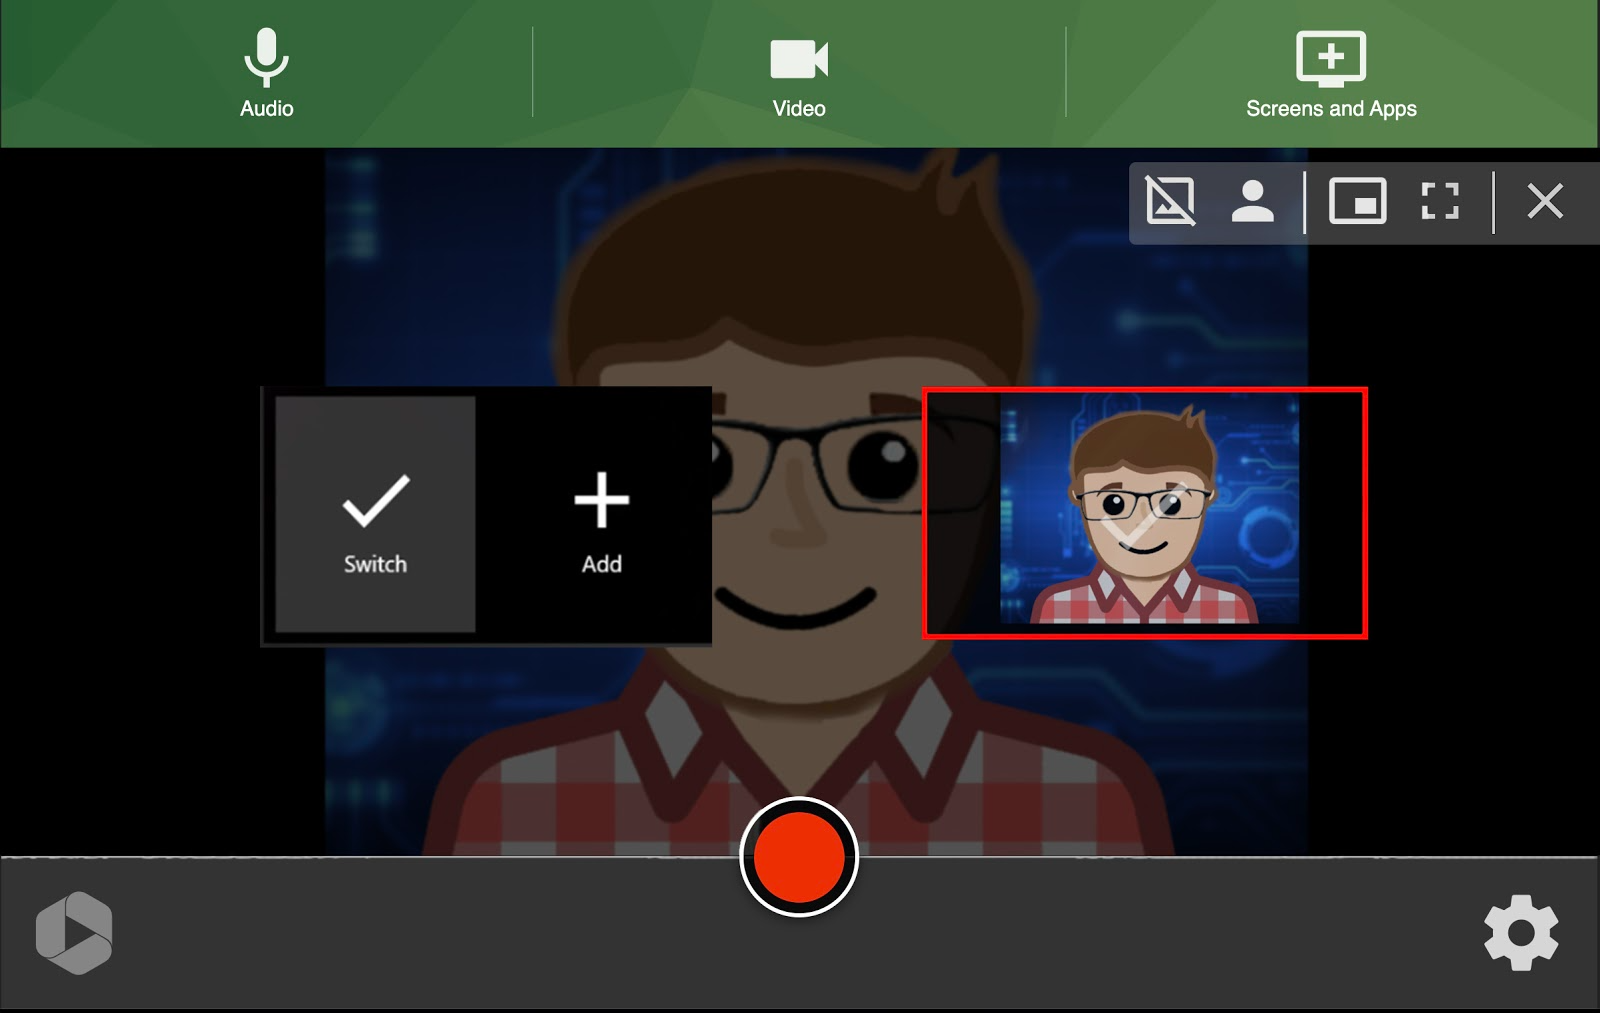
3. Preview Your Camera while Recording - With Panopto Capture you have the option to preview your camera on screen while recording. This was not an option with the local Panopto software.
If you are using a full screen to capture an application window or browser tab while also recording yourself, you can pop your camera feed out of the arrangement while recording to preview what you’ll look like in the final video.
Note: If you are recording the entire screen, this preview will still be captured. This is only recommended for when you are only capturing one application or tab in full screen.
To do this, hover over your camera feed, and select the feeds icon.
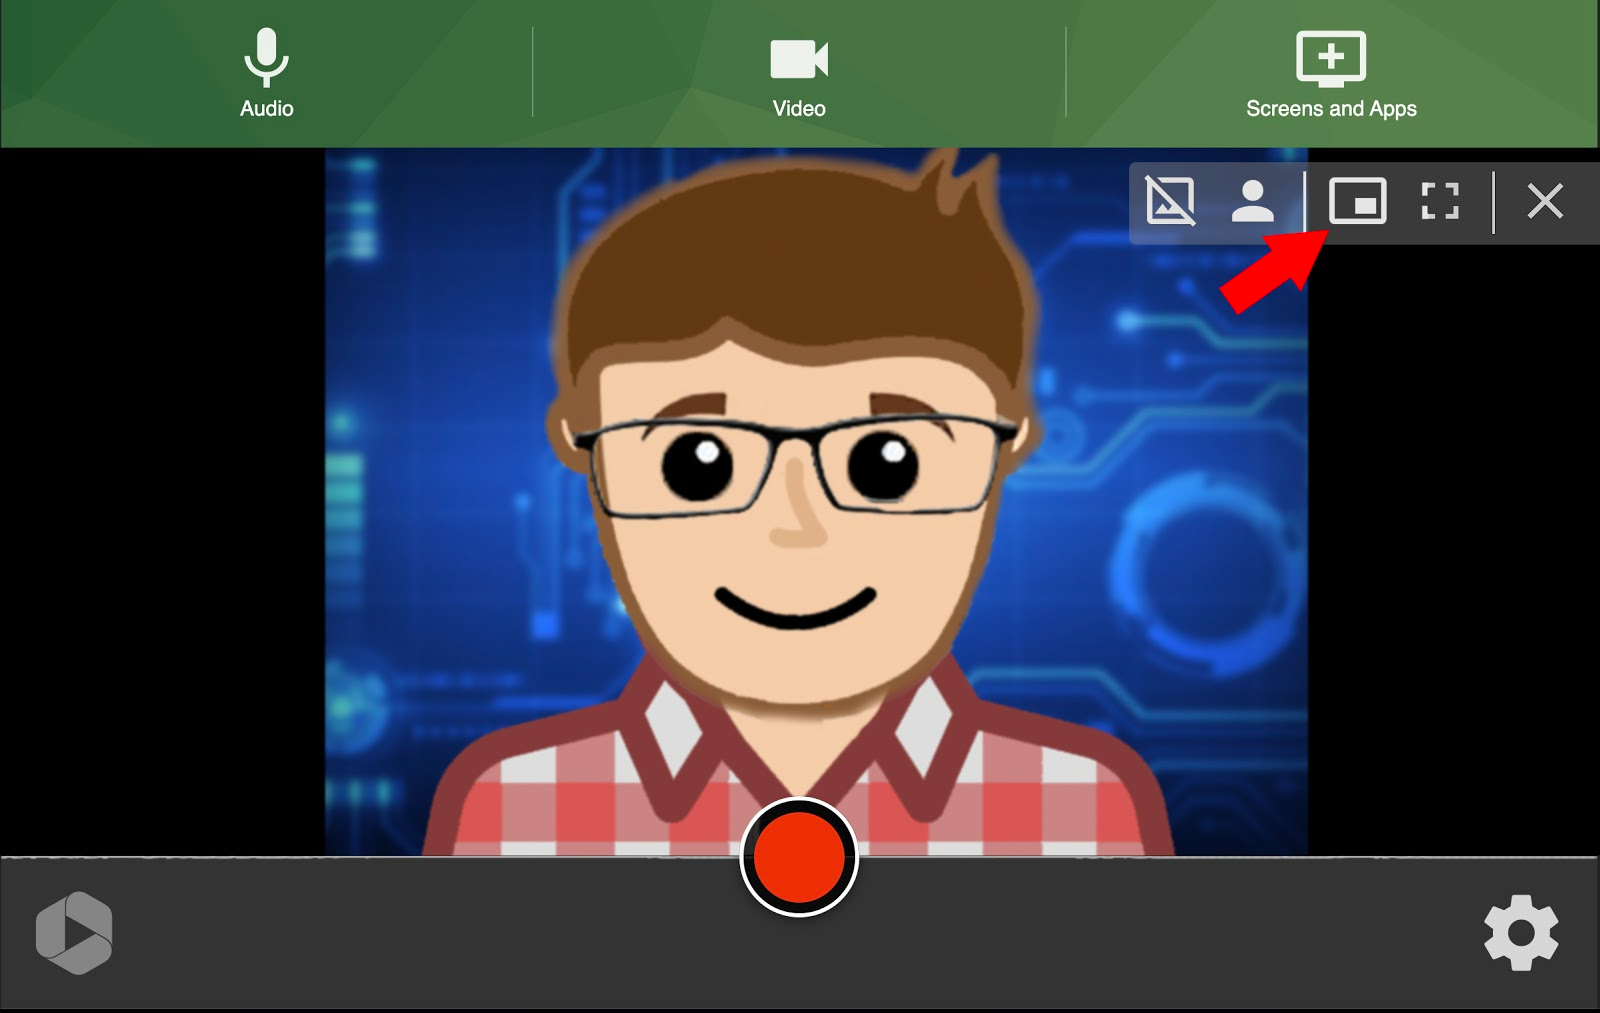
The preview of your camera feed will appear on top of your recorded application or browser tab .

Your application window or browser tab will not record with this image over it. This allows you to see yourself while you are recording, but will still record in your selected video arrangement.
3. Selecting a Microphone
1. Panopto Capture should auto detect the built in microphone . If you want to use a different connected microphone, select the audio icon from the top toolbar.

2.2. Each microphone or audio input source available on your computer will appear. Select the desired microphone, and a checkmark will appear over it.

Test your microphone by speaking at a regular volume.
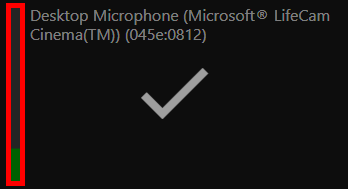
The audio bar to the left of the microphone name should show green feedback as you speak .
If yellow or red feedback appears, the video's audio may be distorted.
If no feedback appears, the microphone is not picking up audio and you may need to check your computer input settings or status of the selected microphone.
You can also see your audio waveform in the Panopto Capture window below your video.

4. Select Screen and/or Application Sources
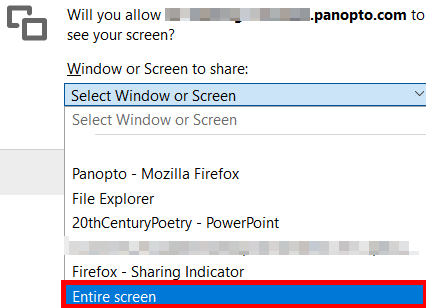
Note: You may need to give additional permission for Chrome or Firefox to access your screen prior to recording a PowerPoint presentation. This can be adjusted under your computer access settings
1. To record a screen, application window, or individual browser tab along with your video and audio you need to select the monitor icon for screens and apps.

2. You will be given the options to be able to record your entire screen (option 1) or a specific application window (option 2). Chrome and Edge users will also have the option to record individual browser tabs (option 3).
Option 1 - Entire Screen Recording:
To record everything that happens on your screen, choose Your Entire Screen. Then, select the screen you want to record and click Share.
Chrome and Edge users:
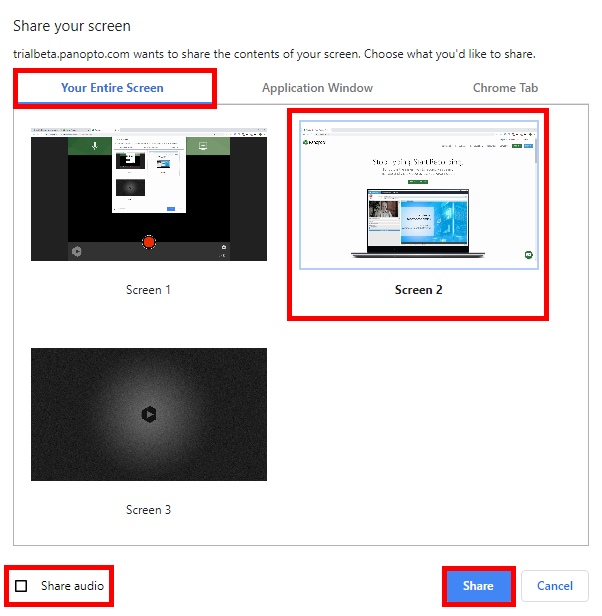
You can select Share Audio to add the audio from your computer to the recording. This is ideal for when you are recording a video or any application that has sound instead of having it captured via your microphone.
Firefox users:
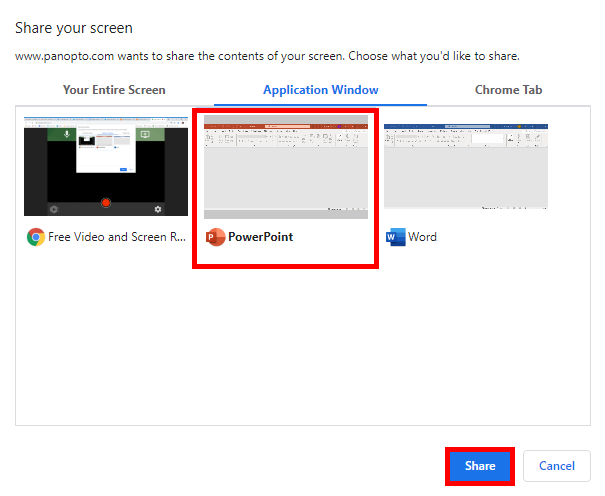
Option 2 - Individual Powerpoint Presentations or Application Windows:
Select the Application Window option to record everything that happens in one application window only such as Powerpoint. Select the application and then click Share.
Chrome and Edge users:
Firefox users:
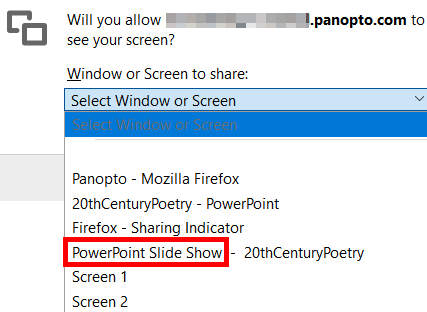
Note: After starting the recording, Panopto will record PowerPoint slides as a video stream when a presentation is put into slideshow mode.
Option 3 - Individual Browser tabs (Chrome and Edge Only):
Select the Tab option, to record everything that happens in a single browser tab. Select the open tab you want to record and click Share.

Note: You have the option to Share audio to add the sound from the selected tab to the recording.
5. Recording your Video
1. To begin recording your video, click the red circle button at the bottom center of Panopto Capture

If enabled, you will see a 5 second countdown on screen, and then the recording will begin. During the countdown, you will also see the options to start recording immediately by pressing Enter, or to cancel by pressing Escape (Esc).
To learn about enabling/disabling the five second countdown, please visit Additional Panopto Capture Settings.
Your recording will capture all sources you have selected during set up until you manually stop it.
To stop recording, select the red square button at the bottom center of Panopto Capture window that has replaced the record button. The video will immediately begin to upload.

Do not close the Panopto Capture browser tab until the upload is complete.
6. Video Upload and Processing
Panopto Capture uses failsafe recording, where your captured media is stored on the local computer using a process within the web browser. This means that even if your browser crashes or your computer turns off, your video will finish uploading next time you launch Panopto Capture in the same browser.
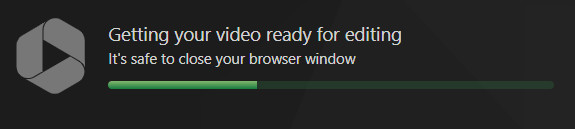
1. Once you stop the recording, a new page will load that shows the video’s progress. Do not close this page until you see the message Getting your video ready for editing: It's safe to close your browser window in the top left corner
Note: The recording will upload to the folder that you were in when you opened Panopto Capture.
2. On the right side of the top toolbar, you can select Redo if you are not happy with the video you have produced and want to return to the main Panopto Capture window to re-record or you can select Record New to begin recording another video.
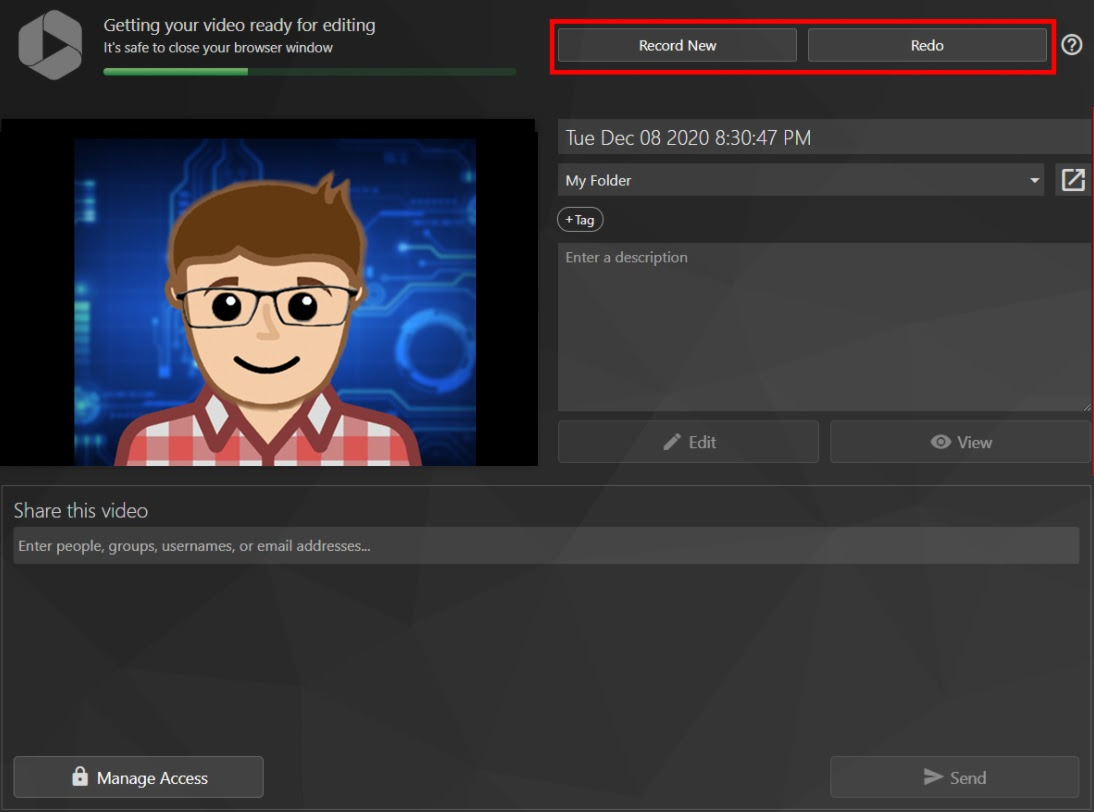
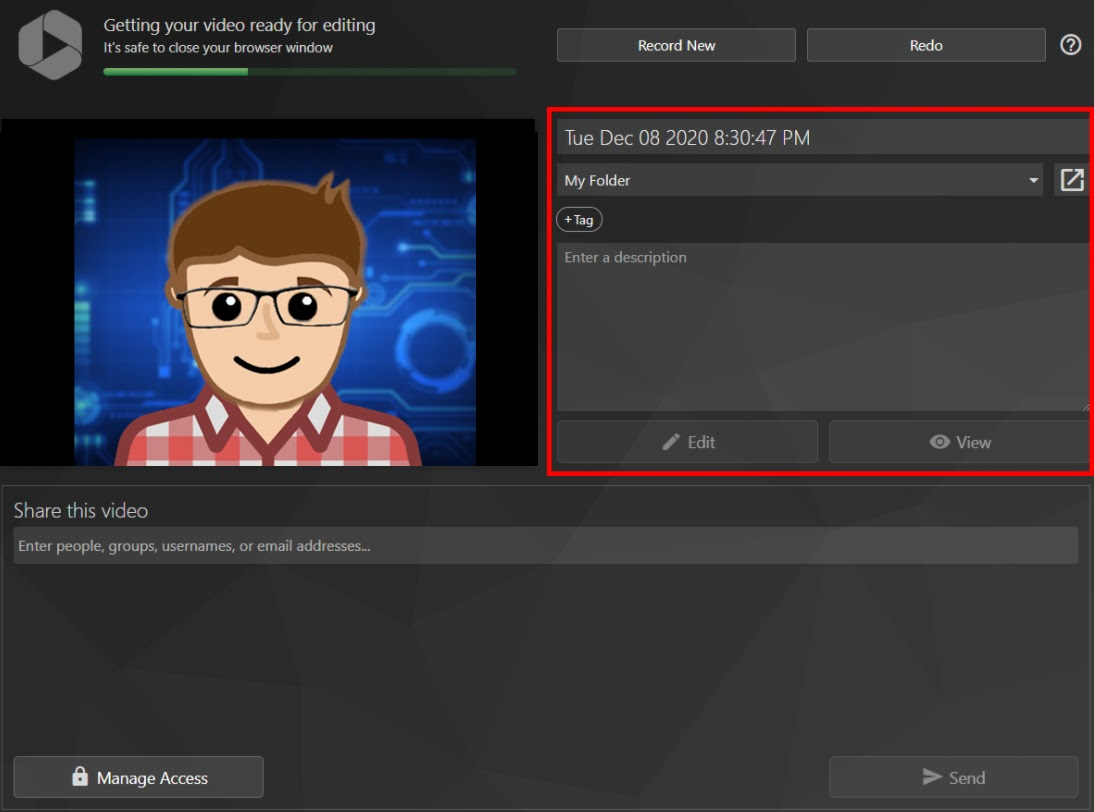
3. In the video details box to the right side, you can edit the video’s name, which automatically uses the date and time the video was recorded as a placeholder, change the video’s folder location, add tags to the video, enter the video’s description.
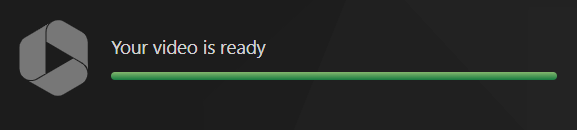
Once the video has processed completely, it will say Your video is ready.
Once processing has finished you can open the video in the Panopto editor by selecting Edit or view it in the Panopto viewer by selecting View.
3. Recordings will be automatically shared with users that have access to the folder in which you record to. Canvas Media Library users will have the recording automatically available to students enrolled in your course.
If you would like to add additional people to allow for view access you can add them at this time.
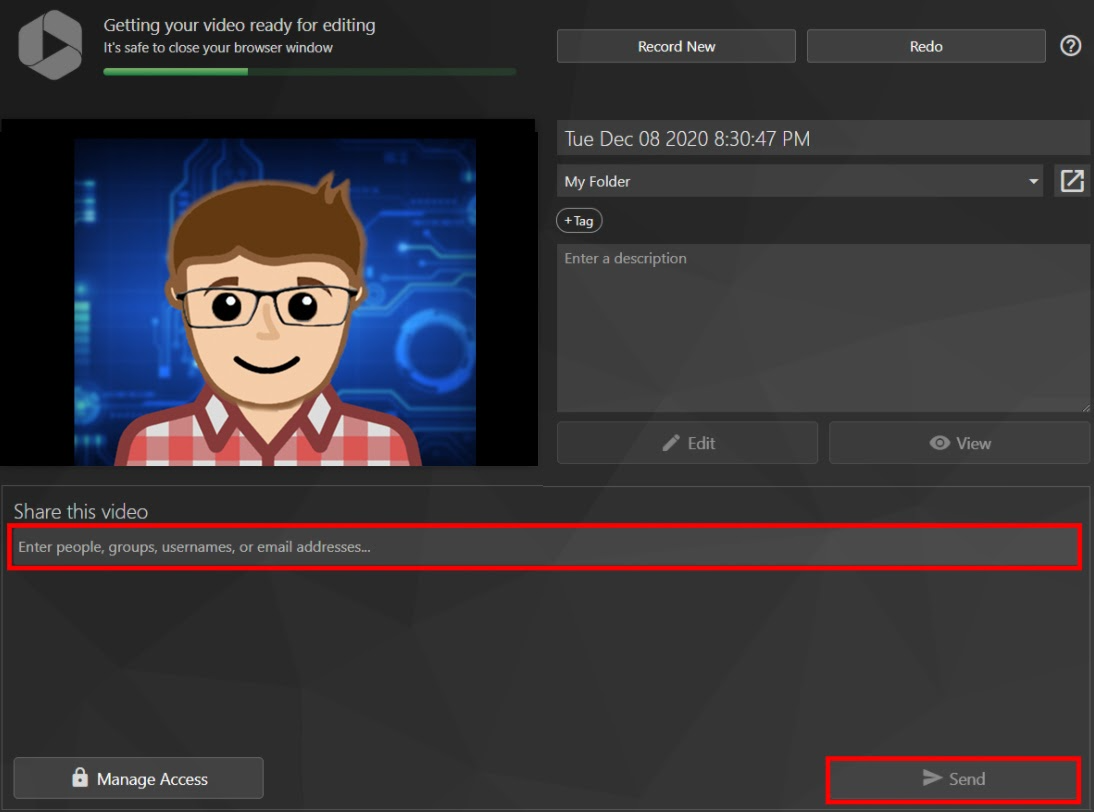
In the text box underneath Share this video, start typing the name, group name, username, or email address of the person or people with whom you would like to share your video and select it from the recommendation list.
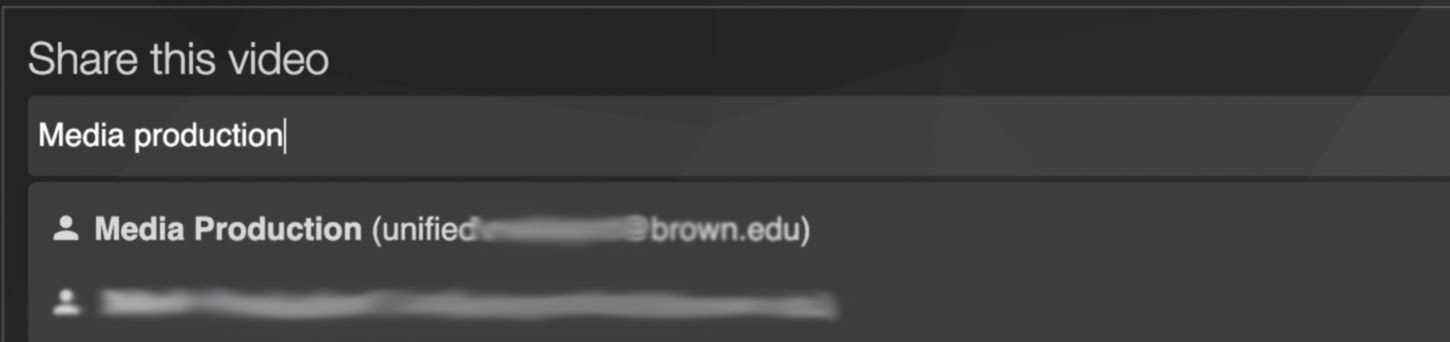
If a user does not appear in the drop down it is possible they have never logged in to Brown’s Panopto site before and would not be searchable yet.
Once you are done, select Send.
4. You can also share your video if you select Manage Access.
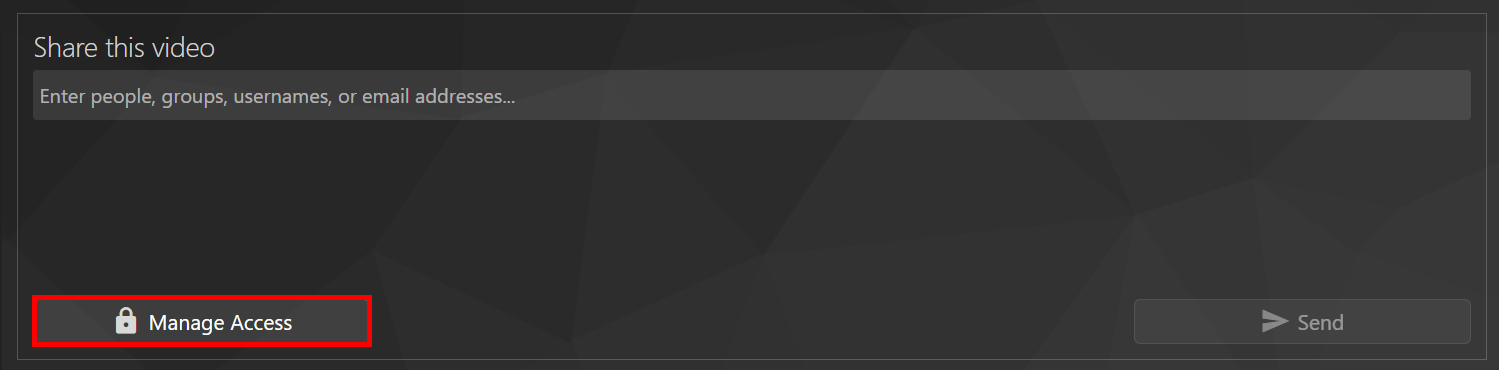
This will direct you to the folder on the Brown Panopto site directly to the video's settings Share option.
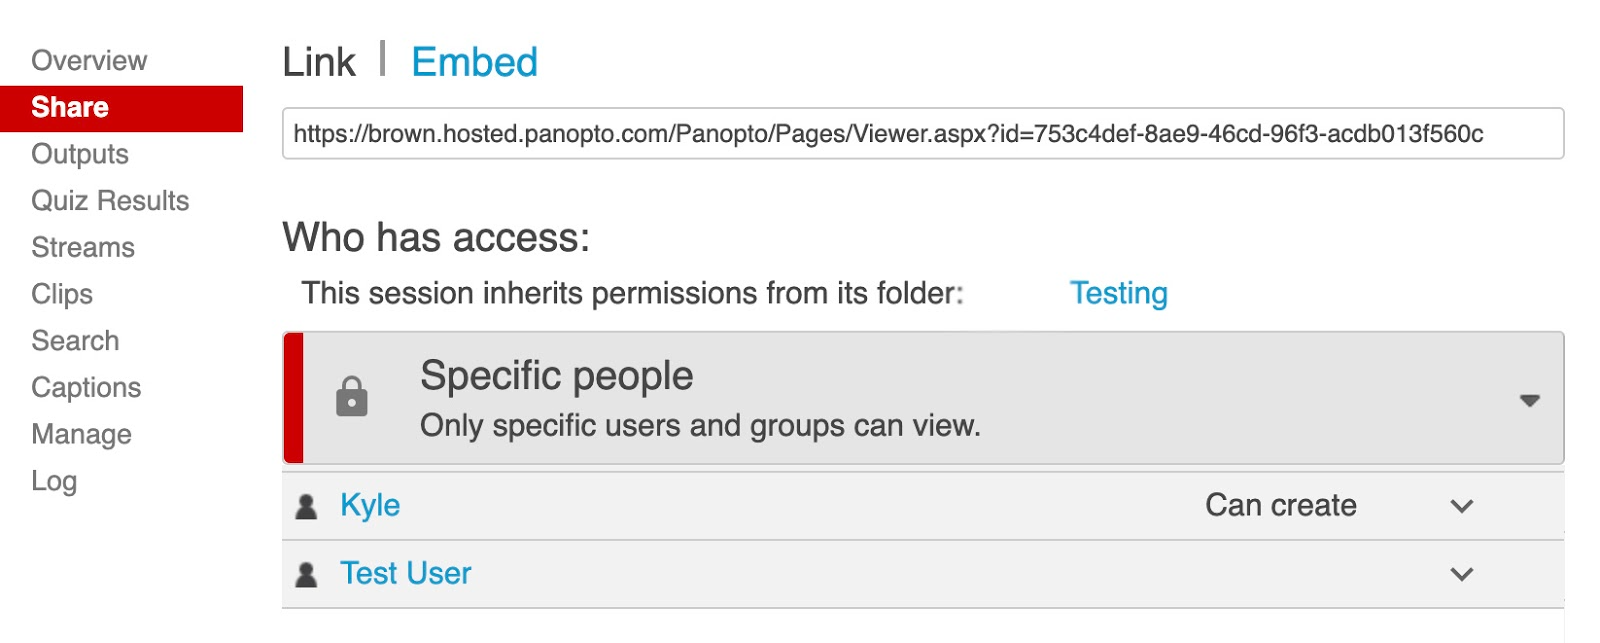
To learn more about how to share a video from this window, visit How to share content on Panopto
To learn about additional features available for Panopto Capture click here.
If for any reason there was an issue while you were recording or uploading, and you would like to send logs to Panopto, select the question mark icon in the top right corner of the upload screen, and then select Send Logs from the drop down menu that appears. After doing so please contact [email protected] to report any issues.
