

One of the many types of equipment the IT Service Center has available to borrow is the ZOOM H1n audio recorder. It is a compact, fairly simple device, but the controls and options available may be intimidating to someone unfamiliar with audio equipment.
This guide is meant to provide the basics for getting up and running with the H1n. If you would like a reference which covers all of the more advanced functions, the full H1n manual is available here.
Supplied equipment
- Zoom H1n audio recorder
- small table tripod
- USB cord and wall plug
- foam wind guard
The controls
Here is an explanation of the various buttons and ports of the H1n recorder.
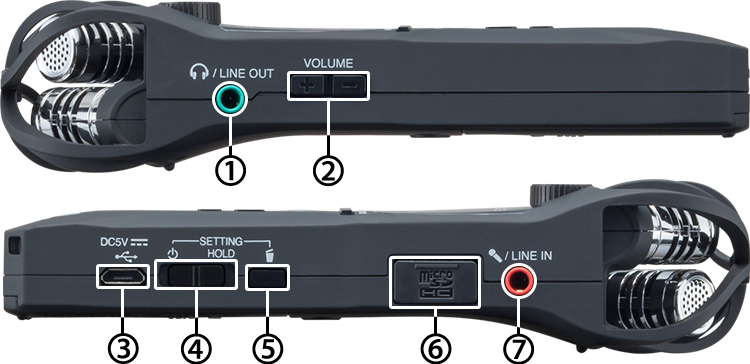
Left side:
- ① headphones port
- ② volume control (for monitor level or file playback)
Right side:
- ③ USB port (for power supply or file transfer)
- ④ power/hold switch
- ⑤ trash button
- ⑥ microSD slot
- ⑦ line in (external mono or stereo mic input)
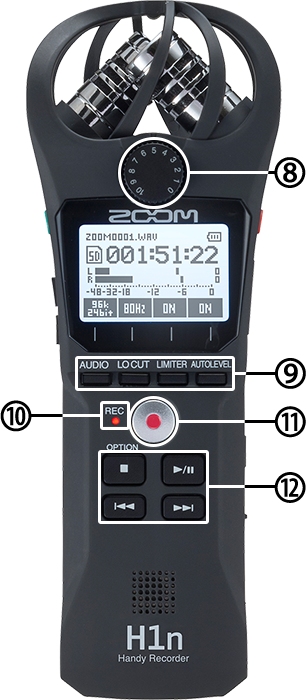
Front:
- ⑧ microphone sensitivity (if Auto Level is disabled)
- ⑨ recording settings controls
- ⑩ recording/peak indicator
- ⑪ record button
- ⑫ playback controls
Quick start guide
If you just want to get the recorder set up so you can make recordings without messing with the controls, here is what we recommend doing.
- Turn on the recorder by holding the switch (④) to the left for at least one second.
- Use the "Audio" button (⑨.1) to ensure the sample rate/bit depth is set to "44.1k 16bit" (
 ).
). - Use the "Lo Cut" button (⑨.2) to ensure the low cut filter is disabled (
 ).
). - Use the "Limiter" button (⑨.3) to ensure the limiter is enabled (
 ).
). - Use the "Auto Level" button (⑨.4) to ensure the input level is automatically controlled ().
- Begin and end your recording using the record button (⑪).
Copying recordings to your computer
When you've finished recording, you can copy the files to your computer.
- Turn on the recorder using the power switch (④) and connect the Micro-USB port (③) to your computer using the USB cord.
- The recorder will prompt for which connection mode to use; using the buttons under the screen (⑨) select Card Reader.
- The recorder will show up on your computer as an external drive ("H1N_SD" or "NO NAME").
- Copy the files to the desired destination.
- When the transfer has finished, eject the drive from your computer.
- Once the drive has been successfully ejected, turn off the recorder and disconnect the USB cord.
Additional functionality
For having such a small form factor, the H1n is a quite fully-featured tool. In addition to the basics mentioned above, it can also be used as a USB audio interface, and has many other options and features not discussed in this quick guide. If you're interested to learn more about what the H1n can do, access the full PDF manual, available for free.
Support
If you need help with your ZOOM H1n recorder, you can contact ZOOM here. Alternatively, if you have borrowed a ZOOM H1n from the Brown IT Service Center, we can also provide assistance using it; simply visit us on the fifth floor of J. Walter Wilson, call us at 401-863-4357, or chat us during our open hours using the button at the bottom right of this page.