Please review the following support options if the microphone (external or laptop/internal) on the device you are using Rosetta Stone with is not recognized. This information can be found with Rosetta Stone's Troubleshooting Documentation:
Rosetta Stone’s speech recognition rate heavily relies on the quality of the signal that it is supposed to analyze. If you have experienced difficulties with the pronunciation activities this document might help.
1. Is Rosetta Stone’s Speech recognition installed?
Rosetta Stone’s speech recognition consists of two software packages:
• the Speech Engine (i.e. the piece of software that analyzes the user’s recordings)
• the Speech Models (i.e. the data that the user’s pronunciation is compared with)
If the installation does not succeed automatically at first launch both components can be downloaded from the following link – they both need to be installed on the learner’s computer. https://download.trstone.com/productsupport/RS_Speech_Models_and_Engine_Installers.zip
The Zip file needs to be saved to the hard drive and then unpacked from there. The Zip file includes installers for
Mac and for Windows PCs (XP, Vista, Win 7 and Win 8 are supported).
2. Adobe Flash Player Settings
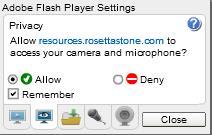
You may need to allow Rosetta Stone to use the signal from your microphone. When you launch Rosetta Stone for the first time and click on one of the activities you should see the following box:

Please click ‘Allow’ and make sure that the check box ‘Remember’ is ticked.
If you do not see this box you can right click somewhere in Rosetta Stone and select ‘Settings’ (as shown below).

3. Windows Microphone Settings
Another possible reason for unsatisfactory recognition rates is when the microphone signal is too low or too loud. If it is too low, the computer artificially makes it louder, but this will add noise to the recording – and make it difficult to understand for Rosetta Stone’s speech engine. If the signal is too loud the recording’s quality will suffer from it too. Ideally the microphone volume should be set somewhere between 75 and 90 %.

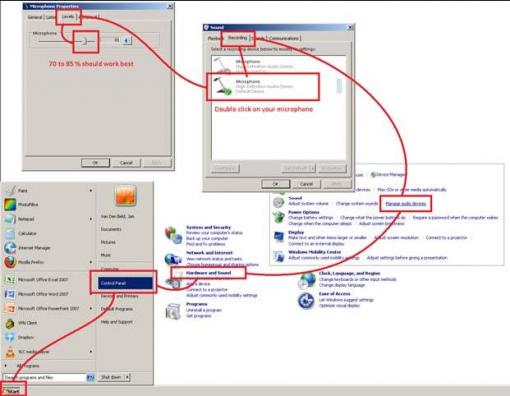
Above is an example of how to make changes to the microphone settings in Windows 7 (you should be able to find screenshots for XP, Vista, Win 8 or Mac OSX on the internet without any difficulties):
Click [Start] and choose ‘Control Panel’ from the menu. Go to ‘Hardware and Sound’ and select ‘Manage audio devices’.
Go to the ‘Recording’ tab and double click on your microphone.
4. Make sure that Rosetta Stone recognizes your microphone
Learners who do not use a USB headset might encounter technical issues if their microphone is not detected by Rosetta Stone’s speech engine. To verify the settings start an activity and select ‘Set Preferences’ at the top right hand corner.
Please note that even though the speech recognition usually works fine with built‐in laptop microphones or analog jack plugs Rosetta Stone officially requires the use of a USB headset. Tech Support won’t assist you if you are not using a USB headset.
Please note: You cannot make changes to the speech precision level yourself. This setting can only be changed by your administrator / teacher.
List of recommended headsets: Altec Lansing AHS302i, Andrea Electronics NC‐7100, Califone 3066‐USB, Logitech USB 350, Logitech USB 250, Logitech ClearChat Pro USB, Logitech H330, Logitech Premium Notebook Headset, Logitech ClearChat Comfort USB, Microsoft LifeChat LX‐3000, Plantronics DSP‐400, Plantronics DSP‐500, Plantronics Audio 500, Plantronics Audio 470, Plantronics Audio 645, Plantronics Audio 655, VXI Talk Pro USB‐100, VXI Talk Pro USB‐200
5. Skype / VoIP / Google Voice
Please make sure that Skype or any other VoIP software is deactivated when you are working with Rosetta Stone as the audio protocols may interfere with each other (and cause problems). If you are using the Google Chrome browser, please check the Google Voice settings.
6. Tip: Do not eat your microphone!
If you headset microphone is placed too close to your mouth this can result in so called ‘plops’. You might have seen videos of studio recordings where singers have a black disk between their mouth and the microphone. This device is called a ‘plop killer’ and it makes sure that phonemes like ‘p’, ‘t’, ‘k’ do not sound distorted on the recording. It also keeps the singer/speaker at a good distance of the microphone.
If you do not place your microphone in front of your mouth but next to it your recordings might sound significantly better.
