

The instructions below are meant for Brown University members who are attempting to connect their personal printer to their personal computer on Brown wireless networks.
Get Your Printer’s IP Address or DNS Address
Once you’ve connected your printer successfully to Brown-Guest, it will get an IP address. This can be used to connect your printer. However, most printers support getting a unique DNS address. The difference between these addresses is that using an IP address will eventually result in your printer not working as its IP address is subject to change. The DNS address will always remain the same regardless of your printer’s IP address.
The unique address is always the hostname followed by .devices.brown.edu
Ex. HP000000.devices.brown.edu
Your printer’s manufacturer will have documentation on how to retrieve either address. Refer to those instructions to get that information and follow through with the rest of these instructions.
You can always contact the help desk to see if we can assist.
Drivers
Depending on your printer, you may have to preinstall drivers. Run the installation software provided by the manufacturer.
Usually this software will attempt to connect to your printer, but this process will most likely fail on campus. Follow through these steps after the software has been installed.
Connect to Printer Windows 7 and above
-
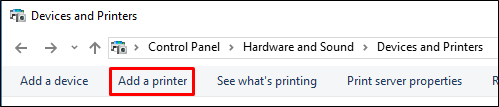
Open Devices and Printers by going to Control Panel > Hardware and Sound > Devices and Printers and click on Add a printer
-
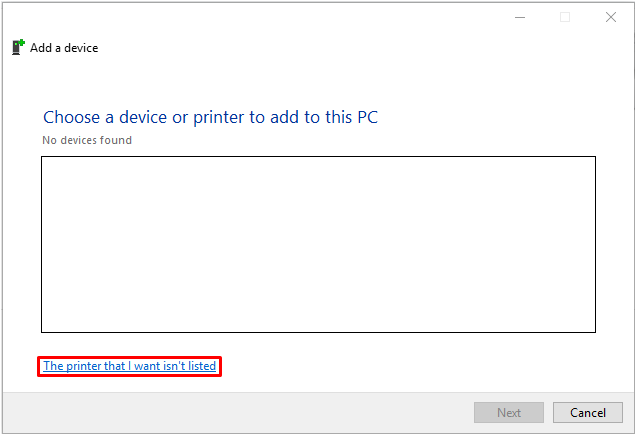
To speed things up, click on The printer that I want isn’t listed in blue.
-
A new window will appear. Select Add a printer using a TCP/IP address or hostname then click Next
-
A new window will appear. Insert the IP address or hostname that you gathered from your printer. Insert this information into the Hostname or IP address: field. The Port name: should match.

-
Click Next until you are prompted to give the printer a name. Here you can leave your option as default or give it a name of your choosing.
-
Click Next to add the printer.
-
Unless you intend to share your printer, make sure that the Do not share this printer is selected, then click Next.
-
On the next window, you can click Finish or Print a test page if you want to make sure the printer is working.