

The Service Center now loans out ZoomH6 Recorder. Below is a brief overview. To find out about loaning one, visit this website for our loaner policy.
ZOOM H6 Recorder
Supplied Equipment
(1) H6 Main Unit
(1) MS Mic
(1) XY Mic
(1) Wind Screen (Sponge)
(1) USB Cable
(1) SD Card
(4) Batteries
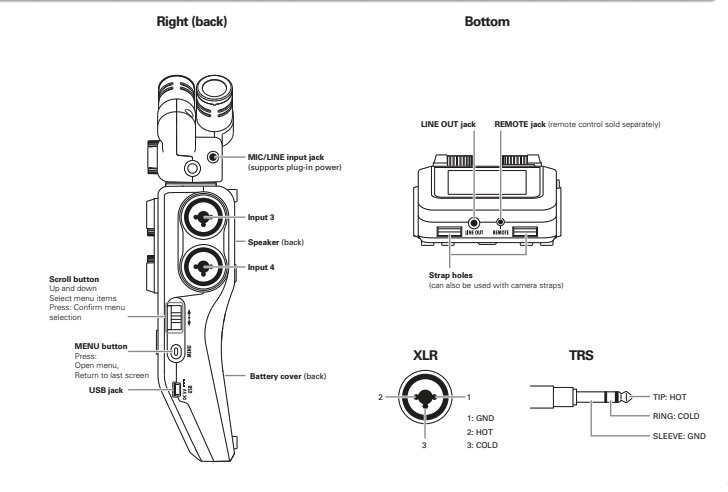
Part Names and Functions
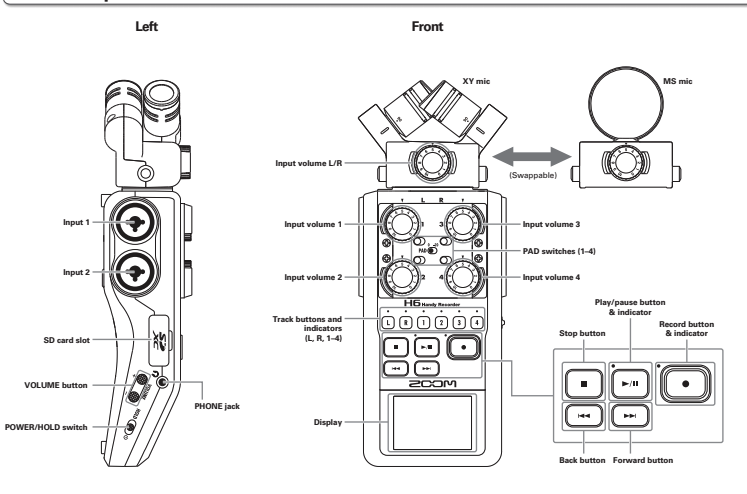
Preparing to Record
Inserting Mics
Remove the protective caps from the main unit and the desired microphone (either the included MS or XY Mic), then insert the microphone into the top of the unit while holding the buttons on either side of the mic to unlock it.
Recording Format, etc.
To change the recording format, press the menu button on the right (back) of the main unit and use the scroll button immediately above the menu button to scroll down to the REC setting and press it with the scroll button. This menu contains recording format settings (WAV/MP3) as well as automatic recording, prerecording, backup recording, etc. The main menu contains additional options to customize the recording experience.
Preparing to Record
Before pressing the record button, select the recording tracks to use (from L, R, 1, 2, 3, and 4 immediately above the record button). Note that 1, 2, 3 and 4 can be used for shotgun mics, lapel mics, ambient mics, and PA Mixers while L and R refer to the chosen mic (either the MS or XY included mic). Also, if two recording tracks are pressed at the same time, they become a stereo track (stereo link).
Input
Use the dials above the recording track buttons for 1, 2, 3, and 4 as well as the dial on the desired mic to adjust input levels.
How to Record
Once the recording track(s) are chosen, start recording by pressing the red record button. Pause recording with the pause/play button to the left of the record button. Stop recording with the white square button left of the record button.
Playback
Press the pause/play button to start playback. Press the fast forward and backward buttons to select project, hold either button to search forward or backward. During playback you can press recording track buttons to mute/unmute specific mics. Press the red record button or the white square end recording button to return to the Home screen.
Transferring files with Computers
Press the menu button on the right (back) of the main unit and scroll down to “USB”, press this setting and then press “SD Card Reader”, a USB logo will appear on the screen. Proceed to connect the main unit to a computer using the USB cable (MacOS and Windows supported). Once connected, drag and drop audio files between the main unit’s SD card and the computer.
Additional Functionality
The Zoom H6 Handy recorder has plenty of additional functionalities, with some requiring extra mics (not included). Use this link to read the full manual:
https://zoomcorp.com/media/documents/E_H6.pdf