The Service Center now loans out Zoom F1. Below is a brief overview. To find out about loaning one, visit this website for our loaner policy.
ZOOM F1 / Preparations
1. Remove the battery cover, and insert batteries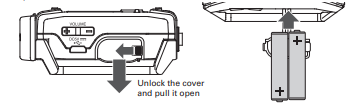
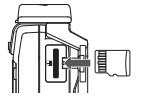
2. Open the microSD card slot cover, and insert a microSD card
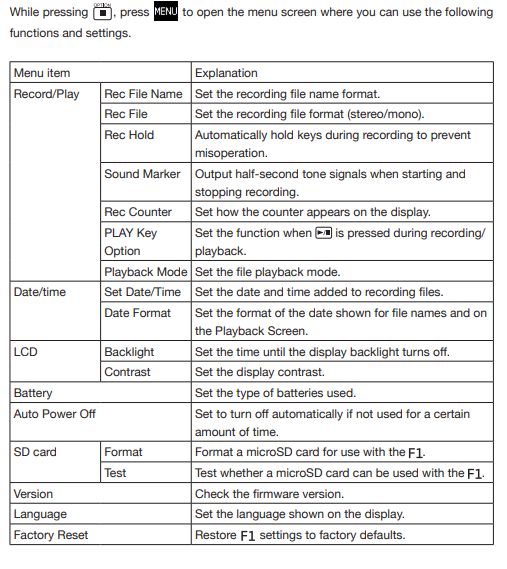
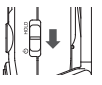
3. Slide toward to turn the power on. Slide ![]() toward HOLD to disable the keys and prevent misoperation during recording.
toward HOLD to disable the keys and prevent misoperation during recording.
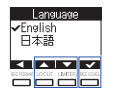
4. Set the language displayed
![]()
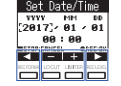
5. Set the date and time.
Assembly and connections
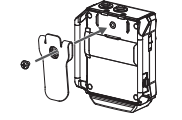
Shock mount
- This can reduce noise when the F1 is mounted on a digital SLR camera.
1. Attach the ends of two arms from the shock mount to one belt loop.
2. Attach the other arms one at a time to the other belt loop. Using the elasticity of the arms, attach their ends to the belt loops while bending them slightly.
3. Slide the shock mount onto the camera accessory shoe and tighten the screw to attach it.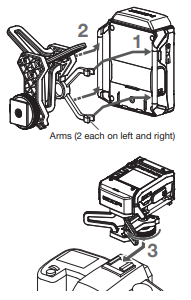
Mic capsules
1. Remove the protective caps from the and the mic capsule.
2. While pressing the buttons on the sides of the mic capsule, connect it to the , inserting it completely.
3. To disconnect the mic capsule, pull it away from the unit while pressing the buttons on its sides.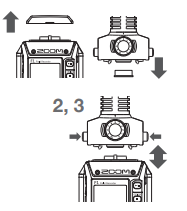
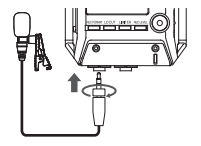
Lavalier mics
1. Attach the windscreen and the clip to the lavalier mic.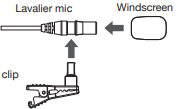
2. Attach the belt clip to the F1 with the screw.
3. Connect the lavalier mic to the MIC/LINE IN jack, and tighten the screw lock.
Input and output settings
Adjusting input levels
- Adjust the level of the signal input to the F1
■ When using a mic capsule
1. Turn ![]() on the mic capsule to adjust the input level.
on the mic capsule to adjust the input level.

■ When using a lavalier mic 1. Press ![]() , and select the input level.
, and select the input level.
■ Adjusting the side mic level (stereo width) of a mid-side mic capsule.
1. When the mic capsule is connected, press![]() , and select the side mic level.
, and select the side mic level.
■ Monitoring audio while recording
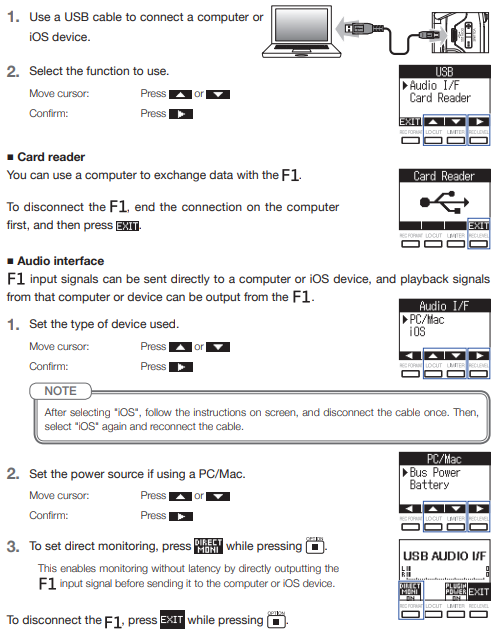
1. Connect headphones to the PHONES OUT jack.
2. Use ![]() to adjust the volume.
to adjust the volume.

Adjusting the levels of connected devices
Play the test tone in order to adjust the level of a digital SLR camera or other device connected to the F1.
1. Minimize the input gain of the other device.
2. Use an audio cable to connect the external mic jack of the other device with the PHONE OUT jack of the F1.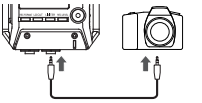
3. While pressing the “Option” button, press “Play Tone”.This plays a test tone from the PHONE OUT Jack.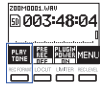
4. Use ![]() to adjust the input level. While checking the audio level meter of the other device, adjust the audio signal level so that it never exceeds −6 dB.
to adjust the input level. While checking the audio level meter of the other device, adjust the audio signal level so that it never exceeds −6 dB.
5. Adjust the input gain of the other device.
While checking the audio level meter of the other device, adjust the audio signal level in small increments until it is about −6 dB.
6. While pressing “Option” press “Stop Tone”.
Stop test tone playback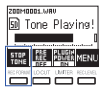
Recording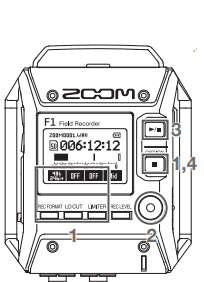
1. Make recording settings • Recording format: Press ![]()
• Low-frequency cut: Press ![]() This can reduce noise from wind and vocal pops.
This can reduce noise from wind and vocal pops.
• Limiter: Press ![]() This prevents clipping caused by sudden loud noises.
This prevents clipping caused by sudden loud noises.
• Pre-recording: While pressing ![]() , press
, press ![]()
Recording will start about 2 seconds before ![]() is pressed.
is pressed.
2. Press ![]() to start recording.
to start recording.
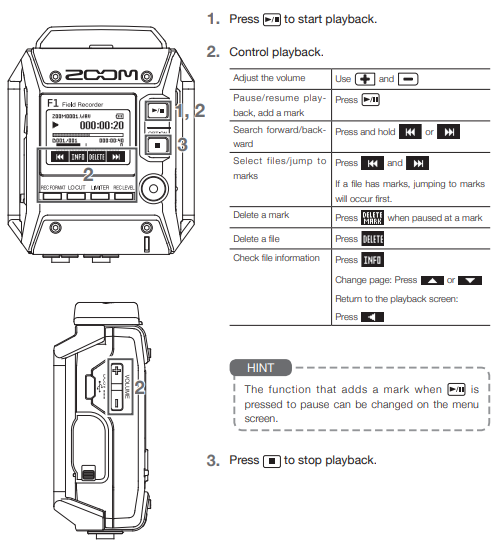
3. Press![]() to pause/resume recording. Pausing will automatically add a mark. During playback, you can jump to the positions of added marks.
to pause/resume recording. Pausing will automatically add a mark. During playback, you can jump to the positions of added marks.
4. Press ![]() to end recording.
to end recording.