Enhanced Zoom Security Options
Zoom default settings make it as easy as possible to start or join a meeting or class. That’s great for usability but may be problematic if you are running a confidential meeting. We want you to know how to run a well controlled meeting, avoid getting "Zoom bombed," and understand your privacy settings.
Accessing your Zoom Settings
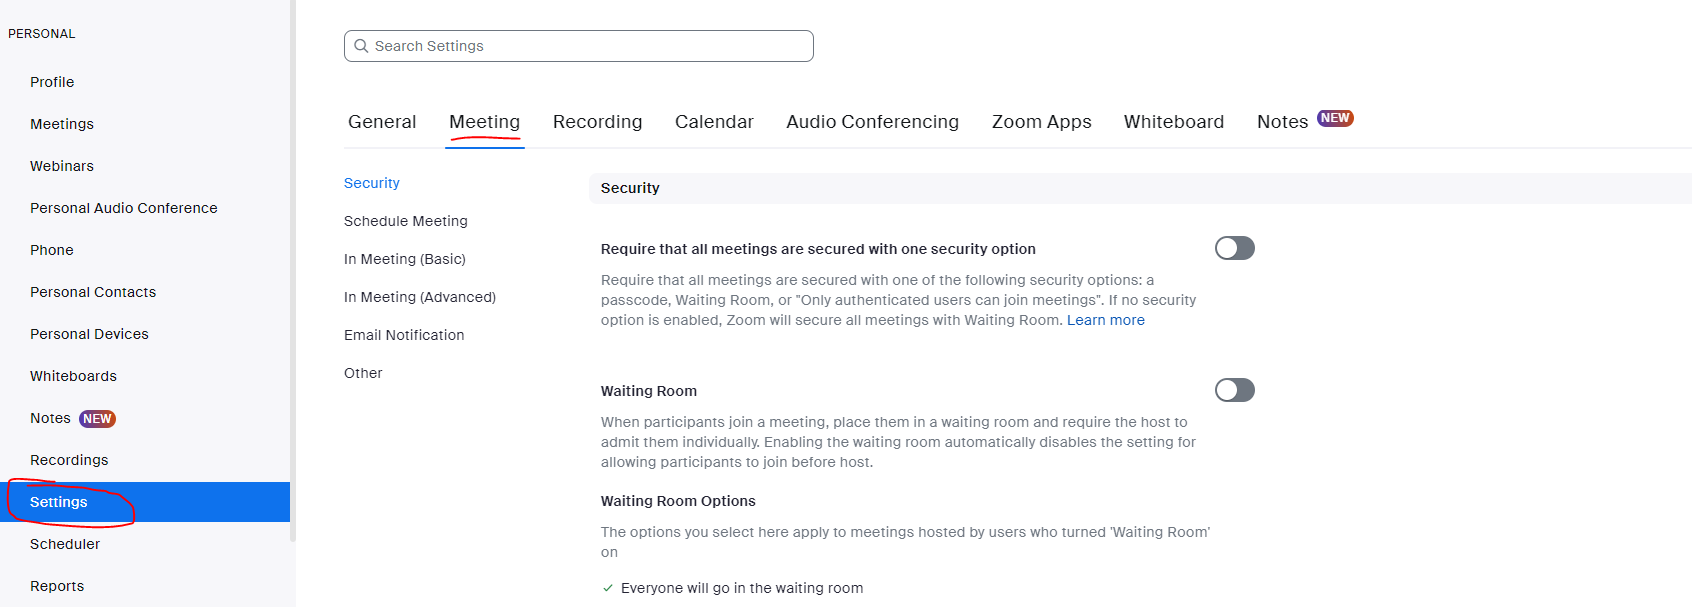
Log in to brown.zoom.us to modify and explore the advanced settings. Please note: it should be easy for students to access your meetings so carefully consider the student experience before you change settings.

You may also change your settings in the desktop or mobile app.
Settings to enhance security
- Require that all meetings are secured with one security option
If you enable this top level choice, all meetings will need to have either a passcode, a Waiting Room, or require Brown authentication to join. This option helps to prevent Zoom bombing by confirming that only the right people are able to join a Zoom meeting. The choices are further described below.
- Require a passcode to join
This setting requires participants to type in a passcode before connecting to a Zoom meeting. Passcodes can be sent to participants via email or via the invitations that are automatically sent when new Zoom meetings are scheduled in advanced.
- Turn on the Waiting Room feature.
The Waiting Room is a virtual staging area that stops guests from joining your meeting until you’re ready for them. Waiting Room is a great way to screen who’s trying to enter your meeting and keep unwanted guests out. You can admit participants individually or all at once (which is useful for large enrollment classes or meetings with many participants. Meeting hosts can customize Waiting Room settings for additional control by personalizing the message people see when they hit the Waiting Room.
- Only authenticated users can join meetings
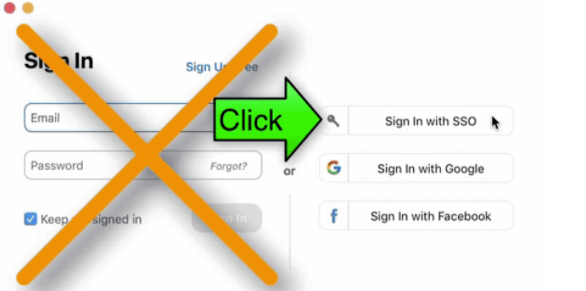
If you enable the "Only authenticated users can join meetings" setting, only participants who are logged into their Brown Zoom accounts will be able to join the meeting. You can turn this setting on for your account or enable it when scheduling a particular meeting. If they're not already logged in, participants will have to log in using SSO in order to join the meeting.

Questions about this? Contact the IT Service Center.
- Play a sound when participants join or leave.
Selecting this option ensures that a sound (chime) is played when someone joins your meeting. Leaving it off may allow someone to join the Zoom meeting that you’re hosting without your knowledge if you are not actively monitoring the participant window. You can also enable this during a meeting. Instructions are here.
- Put attendees “on hold.”
This setting allows the meeting host to temporarily remove an attendee from the meeting and place them in a waiting room. The host or co-host can control this feature during the Zoom meeting via the participants panel. The attendee on hold will see a notification saying “Please wait, the meeting host will let you in soon.” This feature works well for interviews and office hours. You can turn on “Allow host to put attendee on hold” option in your settings. Learn more about the “on hold” function here.
Understanding the privacy of your Zoom meetings
Brown has privacy agreements in place with Zoom that give us confidence Zoom is acting responsibly with Brown data. All Zoom meetings encrypt your data so your conversations remain private.
However, services requiring the use of the Zoom Cloud do require sharing meeting data with Zoom. This data sharing is in line with Brown's established privacy agreements with Zoom. For full transparency and understanding of your privacy settings, the following services require sending meeting data back to Zoom:
- joining a meeting by phone (i.e. dialing in and calling) NOTE: Using the Zoom app to join a meeting from a phone or other mobile device remains fully private
- recording meetings to the Zoom Cloud
- meeting transcriptions generated from a recording
- using live automated captioning during a meeting
- polls
- Zoom Whiteboard
- third-party apps using Zoom (e.g. Zoom integrated into an interviewing portal)
OIT does not encourage eliminating these features as a default. Limiting these options disables important accessibility features that make Zoom a useful collaboration tool, just like Google email.
Further details are provided by Zoom regarding meeting security: https://explore.zoom.us/en/trust/security/
Securing your class or meeting when it’s in progress
In addition to customizing your setting in advance, you can increase the security of your course or meeting by enabling the following features during your meeting.
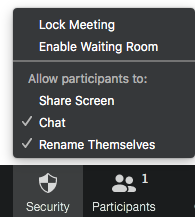
Zoom has a feature called "Security" in the host toolbar.

Clicking on the security icon gives you quick access to control security settings during an active Zoom meeting, including: locking the meeting down, enabling the waiting room, allowing screen sharing, permitting chat, or allowing participants to change the name they display. These on the fly setting changes do not alter your account 's default settings-they just apply to the meeting you are running.
Find more info about Zoom’s new security add-on here.
- View your meeting participants:
When you enter your meeting, the participant panel is not exposed. To manage who is coming and going, click on the word participant. This will open the participant panel. Click on the "Participants" icon located in the menu bar at the bottom of screen.

- Rename your meeting participants:
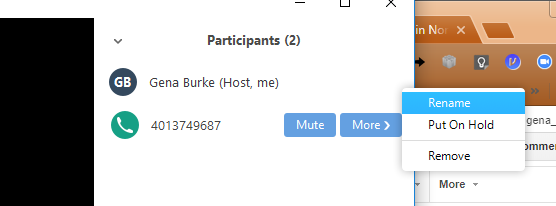
If a participant shows up as a phone number instead of a name, a host or co-host has the ability to change the name in the participant panel.
To change the name via the participant panel, hover over the line where the phone number is listed. A blue button titled more will appear, select it to get the rename option shown below. Change the phone number to the participant’s name.

- Remove unwanted or disruptive participants: From the Participants menu, you can mouse over a participant’s name. Several options will appear, including Remove. Click Remove to immediately remove something from your meeting.
- Allow removed participants to rejoin: When you do remove someone, they can’t rejoin the meeting using the same email address. But you can toggle your settings to allow removed participants to rejoin just in case you remove the wrong person.
- Disable video: Hosts can turn a participant’s video off. This will allow hosts to block unwanted or distracting gestures on video.
- Mute participants: Hosts can mute/unmute individual participants or mute all participants at once. Hosts can block unwanted or distracting noise from other participants. If you enable "Mute Upon Entry" in your settings you'll keep things quiet when attendees join large meetings.
- Turn off annotation: You and your attendees can doodle and mark up content together using annotations during screen share. You can disable the annotation feature in your Zoom settings to prevent people from annotating.
- Lock your meeting
You can lock your meeting from the security icon. This is ideal for Zoom hosts who repeatedly use their personal meeting ID to invite their attendees. Please note that we do not recommend using your personal meeting ID for remote classes. More info about using Zoom for remote teaching is here.
Once you lock the meeting, people who try to enter will be notified that the meeting is locked. As the host, you will not know who is trying to enter the room. In some cases putting a user on hold makes more sense.
Other Zoom features worth knowing
There are many other features that you can enable to have a more secure and controlled meeting but these may diminish the ease of use for your Zoom meeting. That’s why we put them at the bottom of this article.
- Audio Type
Zoom default settings allow users to join a meeting using both Telephone and Computer Audio. In some cases you may want to have your participants only use one type of audio like the phone or a 3rd party bridgeline instead. If you change your default to allow users to only connect via telephone and combine it with the “Generate and require password for participants joining by phone” option, you have increased the security of your call.
- Chat
By default participants can send chats that will be visible to all participants and are also able to chat privately amongst each other. These features can be updated/turned off in your Meeting Settings under the "In Meeting Basic" section. You can also turn chat on or off during a meeting by clicking the "security" icon.
- Screen Sharing
By default, the screen sharing setting in educational accounts (including Brown's) allows only the host to share their screen. Change this by going into your My Meeting Settings. In the “In Meeting (Advanced)” section you can customize who can share their screen. You can also turn chat on or off during a meeting by clicking on the "security" icon.
Other Considerations:
- Brown disabled in-meeting file transfer setting when we implemented Zoom. In-meeting file transfer allows people to share files through the in-meeting chat. Because it’s not enabled, participants cannot send files or images through chat. And if you don’t want chat enabled at all, you can turn that off in your user settings (more on that below.)
- Brown enabled the "identify guest participants" setting. Participants who belong to our Brown account can see that a guest (someone who is not logged in with their Brown account or does not have a Brown account) is participating in the meeting/webinar. The participants list indicates which attendees are guests. The guests themselves do not see that they are listed as guests.
