

Supplied Equipment:
1 Sony Handicam HDR-CX675
1 AC/USB adapter
1 USB extension cable
1 Road microphone
1 Red audio cable
Storage
The Sony Handicam HDR-CX675 comes with 32GB of built-in memory. We also provide a 64GB microSD card, which you can find in the microSD card slot. In the camera.
Part Names and Functions:
Back Side:

A: Battery
B: Record Button
Top Side:
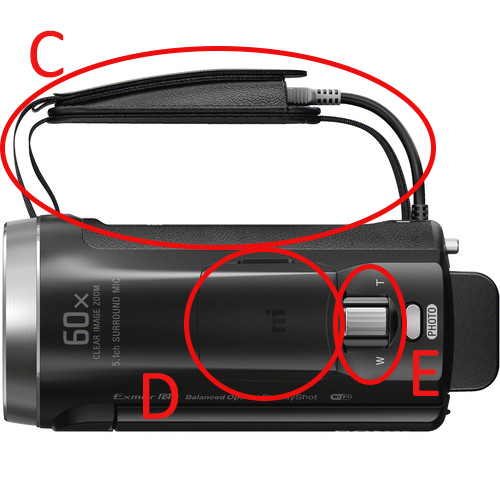
C: USB Cable
D: Site of attachment for road mic
E: Zoom stick
Left Side:
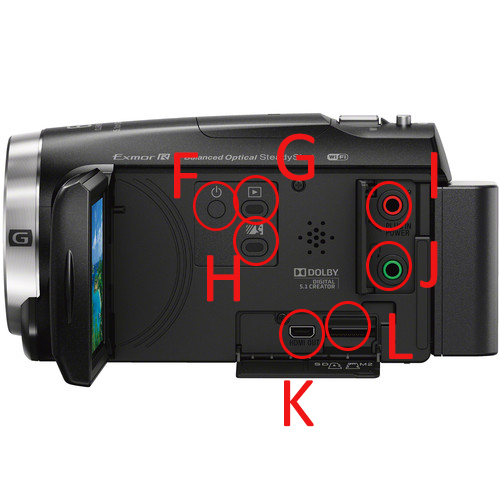
F: Power button
G: Play button
H: MyVoice cancelling button
I: Audio input port
J:Audio output port
L: Mini HDMI port
K: MicroSD slot
Charging the battery:
The battery can be charged by plugging the USB cable that comes out of the right side of the camera into any working USB port. The battery should be inserted in the camera when you charge it. You can also use the AC/USB adapter and the USB extension cable, if necessary, which are both provided with the kit. You will know that the camera is charging if the power light above the words “Power/Chg” is orange. The light will turn off if the battery is full.
Formatting the memory card:
To ensure that you have as much space as possible before recording, format the memory card. This will delete every video on the card, so do not do this unless you have already transferred your old videos off the camcorder. To format the card, follow these steps:
1. Press MENU > Setup > Format > Memory Card > OK
2. Press MENU > Setup > Media Select > Memory Card
Video shooting basics:
Opening the monitor should turn the camera on automatically. If it does not, press the power button on the left. Your camera comes with a microSD card that has enough storage for about 2.5 hours of footage. Do NOT remove the microSD card! For the best audio results, use the road microphone provided with the kit. Connect the microphone using the red audio cable provided with the kit. The mic can attach to the top of the camera.
If you are not sure about what settings to use, scroll to the bottom of this KB article to see a list of our recommended settings.
Press the record button on the right of the battery to start. The red “REC” at the top will tell you that you are recording. Press the record button again to stop. Zoom out by pushing the zoom stick to the left and zoom in by pushing it to the right.
To reduce the volume of whoever’s behind the camcorder, press the MyVoice cancelling button on the right of the monitor.
To review your shots, press the play button next on the right of the monitor. Return to the recording mode by pressing play again.
Saving to your computer:
Plug the camcorder into your computer’s USB port using the cable attached to the camera. The
camcorder must be turned on for your computer to recognize the camcorder. Your video files can be found on your computer under
Untitled > PRIVATE > M4ROOT > CLIP
Copy and paste your .mp4 video files into your destination.
Recommended Settings:
All of these recommended settings can be found under the MENU in the top left.
Image Quality / Size:
File Format: AVCHD
Frame Rate: 30p
Dual Video: Off/Disabled
Camera / Mic:
White Balance: Auto
Spot Meter / Fcs: Manual
Spot Meter: Manual
Spot Focus: Auto
Exposure: Manual
Focus: Auto
IRIS: Auto
Shutter Speed: Auto
AE Shift: Off/Disabled
White Balance Shift: Off
Low Lux: Off
Scene Selection: Auto
Picture Effect: Off
Cinematone: Off
Fader: Off/Disabled
Self-Timer: Off/Disabled
SteadyShot: Intelligent Active
SteadyShot: Off/Disabled
Digital Zoom: 350x
Auto Back Light: On
Face Detection: Off/Disabled
Smile Shutter: Off/Disabled
Smile Sensitivity: Normal Smile
Flash: Off/Disabled
Flash Level: Off/Disabled
Red Eye Reduction: Off/Disabled
My Voice Canceling: Off
Blt-in Zoom Mic: Off
Auto Wind NR: On
Audio Mode: Off/Disabled
Audio Rec Level: Auto
My Button: -
Grid Line: Off
Display Setting: Auto
Audio Level Display: On
Support
If you have borrowed it from the Brown IT Service Center, we can provide assistance; simply visit us on the fifth floor of Page-Robinson, call us at 401-863-4357, or chat us during our open hours using the button at the bottom right of this page.