You can use Zoom Scheduling Privileges If you're a scheduling assistant who regularly sets up meetings for other people that you don't attend yourself. These privileges can be used schedule other people's meetings, and ensure that they're the Host of their own session. That way, they'll be the person who has full control of the meeting and gets meeting summaries afterward.
To get started, the host who needs scheduling assistance should go into their Zoom console and assign the scheduling privilege to their assistant(s). Giving this permission to others is your key to success.
You can find a brief summary of the process below, and Zoom's detailed instructions are here for your reference.
Assign Privileges
The Host assigns Zoom scheduling privileges to the person they intend to schedule for them (such as an executive assistant, hiring coordinator, etc.)
You can assign the role by:
- Logging into Zoom at brown.zoom.us
- Select the Settings menu, located on the right hand sign of the screen, then click the Meeting tab
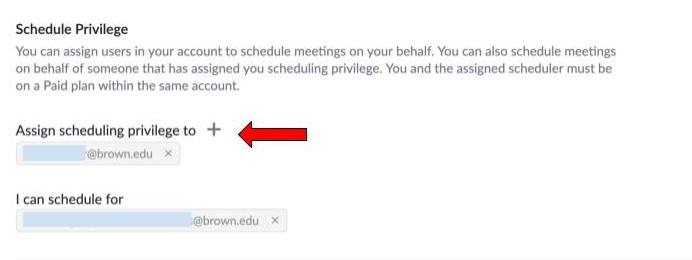
- Find the Other section at the very bottom of the setting menu. You'll see a section for Schedule Privilege.
- The Schedule Privileges menu is located under the Other section as looks as pictured below

- Click on the plus sign to assign a scheduler. The system will only allow you to pick a person who has a Brown Zoom account. If the system does not allow you to assign them, most likely they need to activate their Zoom account. If you have questions on whether or not a user has a Zoom account, contact CAP@brown.edu. The CAP office can verify if the user has a Zoom account. Note that by default, all active faculty, students, and staff have Zoom accounts by default.
- Once the name appears under the assign scheduling privileges section, the user now how the ability to schedule for you. To remove a person later, simply go back to this section and click the x by the scheduler's name.
Note: Meetings will default to the selected meeting settings of the Host’s account and not what is selected in the schedulers meeting settings. The scheduler’s meeting settings selections are for their own Zoom meetings, if they were ever to host one themselves.
More details and a full overview for the Zoom Scheduler feature can be found in this knowledgebase article on the Zoom Support page.
Schedule from Zoom Client
The user given scheduling privilege will need to sign out of the Zoom client and sign in again for the scheduling privilege option to appear.
Sign in to the Zoom desktop app.
On the Home tab, click Schedule. This will open the scheduler window.
Find the Schedule for section, found below the Topic section, and choose the user you want to schedule for from the drop-down menu.
Adjust other meeting settings as needed.
Click Save to finish, and open up the calendar you have selected.
Schedule from brown.zoom.us
Sign in to the Zoom web portal.
In the navigation menu, click Meetings.
In the top-right corner, click Schedule a Meeting.
In the Schedule For section, click the drop-down menu and choose the user you want to schedule for.
Adjust other meeting settings as needed.
Click Save to finish.
Zoom AI Summaries as a Scheduler
Zoom will send meeting summaries to the person(s) selected in the Automatically share summary with: setting. If you are scheduling a meeting on behalf of someone else, confirm the host has selected the option below.

If the host wants to share the meeting summary with alternate hosts, in the event they are not able to attend their meeting, Only meeting host, co-host, and alternate hosts is another option. Please note that as a scheduler, if you attend the meeting, Zoom will automatically consider you a co-host and you will receive a copy of the meeting summary.
