

These instructions are for Windows users only, if you need instructions for Mac, see our article Recording with Panopto Recorder for Mac.
1. Launch the "Panopto Recorder" program by selecting the shortcut on your Desktop.

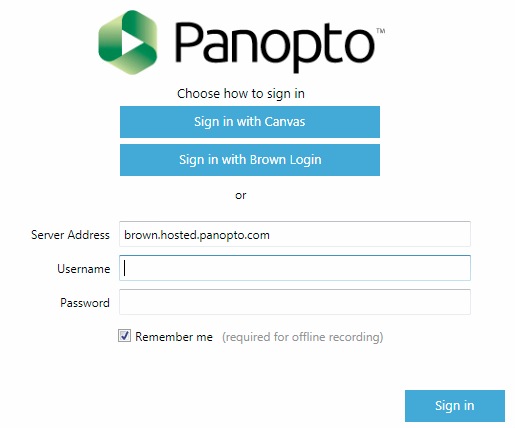
2. Ensure that you are logged in:
- Check to make sure the server address is set to brown.hosted.panopto.com
-
- If not automatically prompted, select "Sign in with Brown Login"
- You will be prompted to log in with your Brown credentials
3. Begin setting up your capture using the following options:

- Set the folder for the course you wish to record to (You can select None “Offline” if you do not wish to upload to course right away)
- Give the recording a name (default is the date and time of the recording)
- Optional: You have the ability to live webcast any recording session
- Set your video camera source if needed from the drop down menu (Select None if no video is desired)
- Select your audio source (the recorder will notify you if you try to record without audio)
- Select Capture Computer Audio if you have videos or media that will have sound during the recording.
- Select Capture Main Screen to record your computer screen (Toggle preview in window by clicking “Enable screen capture preview”)
- Optional: You can add additional inputs to be recorded such as external monitors or document cameras or other webcams.
- Optional: The check box for Capture Powerpoint will automatically pull the slides, titles, and lecture notes into the online session as an additional source and for more robust searching. This is not required to be selected if you are capturing your main screen, it is an optional feature that will only capture the slides as still images and any animations or mouse movements will not be included. For motion or animations Screen Recording is required.
- Press Record to begin after configuring your settings. (or Press F8)
NOTE: You can adjust quality of video and computer source recordings using the drop down and slider bars respectively underneath each source.
4. Recording will start automatically once you press the record button. A capture needs to be at least 10 seconds for it to be saved.
- You can pause a recording by pressing F9
- To stop a recording you can press F10
- You can also control the recording opening the Panopto window from the dock and selecting pause or stop.

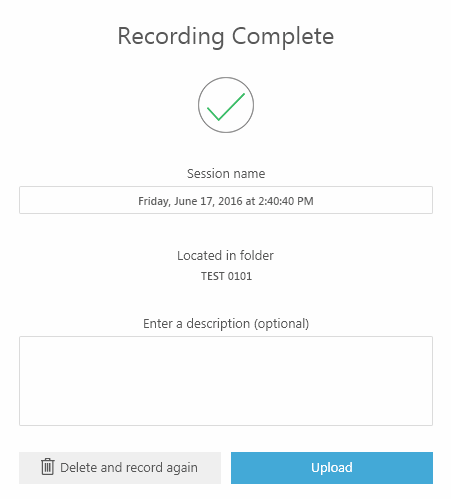
5. Once you stop a recording you will see a recording Complete notice giving you the option to delete and record again or to Upload. At this screen you can also add a description to your recording and edit the title.
After selecting Upload you will be brought to the upload screen to see the progress.

Once the upload step is complete it will begin processing online and you can exit the software.