Pre-assigning Participants to Zoom Breakout Rooms
As a meeting host, you can create Breakout Rooms during the Zoom meeting. Zoom also allows you to pre-assign participants to Breakout Rooms before the start of your meeting.
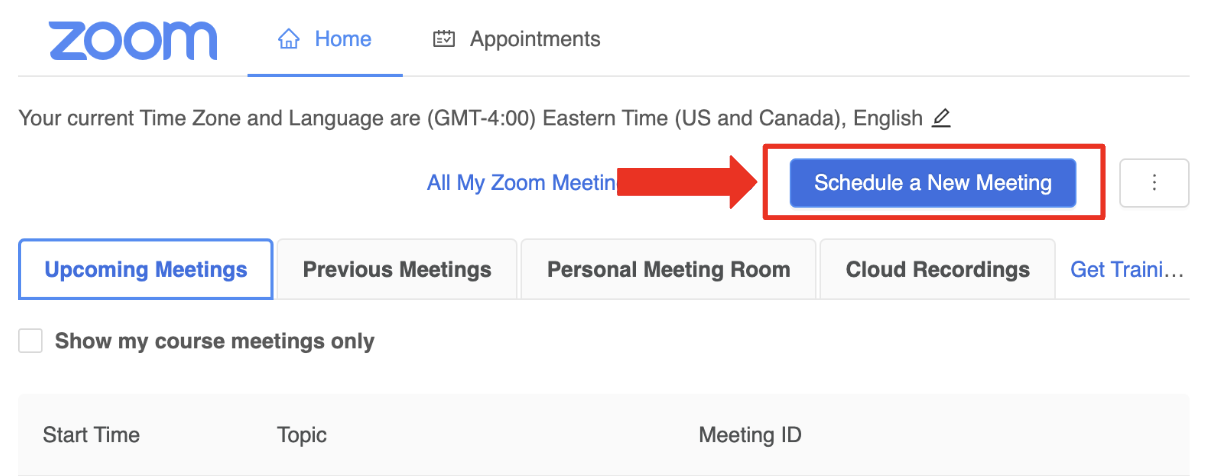
Schedule a New Meeting
If you do not have a recurring Zoom meeting or Zoom meeting setup in your Canvas course first go to your course in Canvas, click on Zoom, and schedule new meeting.
Pre-Assigning Users to Breakout Rooms within the Zoom Website
Breakout Room settings cannot be accessed through the Canvas interface, so you will need to access Zoom from a web browser to pre-assign participants to Breakout Rooms.
- Login to your Brown Zoom account by going to brown.zoom.us and click Log In.
- Log in with your Brown username and password.
- In the upper-left corner of your Zoom profile page, click the Meetings button.
- This page contains all of the Zoom Meetings associated with your account, including ones you created within your Canvas course sites. To edit a meeting you have already created, select the blue Topic link for that specific Meeting.

- Then you will need to click the Edit button on the bottom-left of the page to access the Meeting's Settings.
- Scroll down to the Meeting Options area, click Show to expand it, and check both the Mute participants upon entry box and the Breakout Room pre-assign box.

You have two options for pre-assigning Meeting participants to Breakout Rooms that will be visible when you select this option:
|
Directly assigning users to Breakout Rooms via the Zoom website’s interface
- Click the + Create Rooms link. This will open up a pop-up menu that will allow you to both create Breakout Rooms and also assign users to them.

- Once you have the Breakout Room Assignment window visible, you will see that this window is divided into two columns. Click the + icon next to "rooms" on the left to create a single Breakout Room.
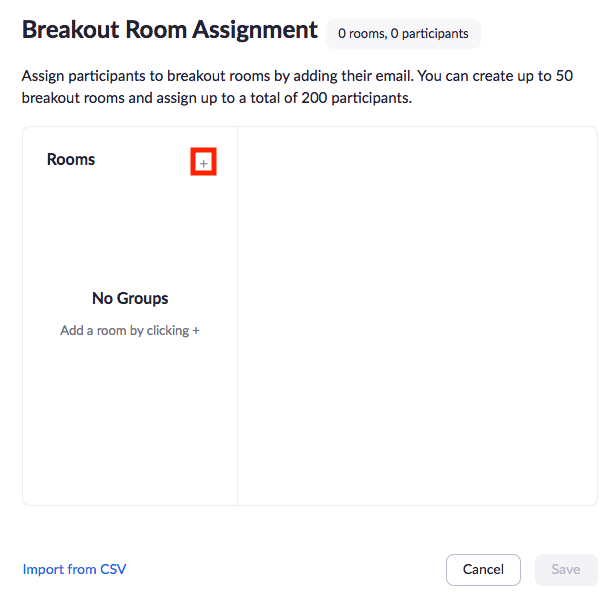
- You will see the room you just created listed on both the left and right columns. To edit the name of the Breakout Room, select the specific Breakout Room name in the left column. Then, click on the name of the room in the right column and type out a new name.
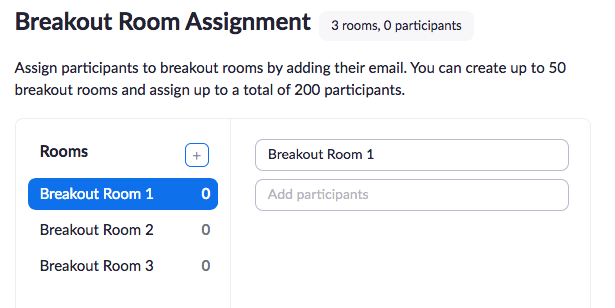
- To add participants to a given Breakout Room, go to the Add participants box and type in their name. Then, hit Enter/Return on your keyboard to save that user to the Breakout Room.
- You can add additional Breakout Rooms to your Meeting and assign additional participants to each as necessary. If you wish to add Teaching Assistants (TAs) to any of the rooms make sure to assign them to a Breakout Room. When you have finished creating all the Breakout Rooms that you want to use, click the Save button.
- Click the Save button at the bottom of the Meeting Settings edit menu.

Pre-Assigning Users to Breakout Rooms with a CSV upload
Before starting this process, we recommend that you have a list of your students' email addresses.
- Click the Import from CSV button on the Meeting Settings edit page.

- Click the download link in the pop-up window that appears in order to download a .csv template for Breakout Room pre-assignments. You will want to save this .csv template to your device.
- Open up the .csv file you just downloaded. You will see two columns present, one (Column A) that reads “Pre-assign Room Name” and another (Column B) that reads “Email Address”, along with some filler text for a few rows under the title cells. These cells demonstrate how the .csv file should be formatted to properly pre-assign participants to a given Breakout Room.
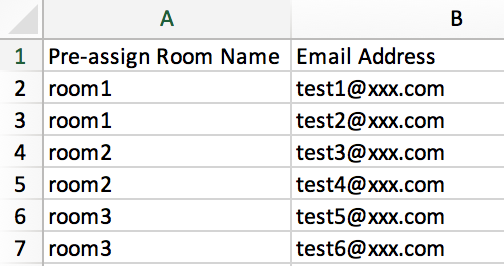
- To add a user to a given Breakout Room, you will want to put the desired Breakout Room’s name in Column A (starting with Row 2) and their Brown email address in the same row in Column B. Do not replace the title cells in Row 1.
- To add multiple users to a room, you will need to type each individual user’s email in a different row in Column B while putting the same Room Name in Column A, as demonstrated below. As long as the Room Name spelling is the same between users, Zoom will group those users together in the same Breakout Room with that name.
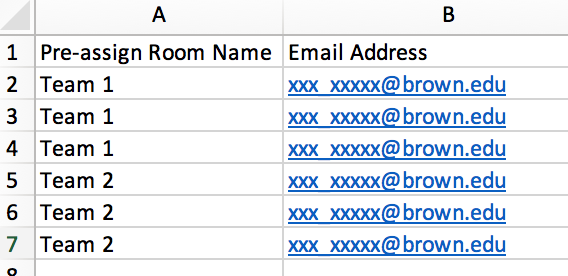
- To add another Room and assign users to it, simply use a different Room Name in Column A for each user. Again, ensure the Room Name spelling is consistent between users for that room. If you wish to add Teaching Assistants (TAs) to any of the breakout rooms make sure to include them in the CSV file.
- Once you have finished entering in all of your Room assignments, save the .csv file to your device.
- Return to the Zoom menu in your browser. You can either drag and drop the newly created .csv file into the pop-up window or use the browse link to locate the file in your device’s storage. Once you have selected the .csv file, Zoom should automatically create Breakout Rooms and assign users based on the contents of that .csv file.
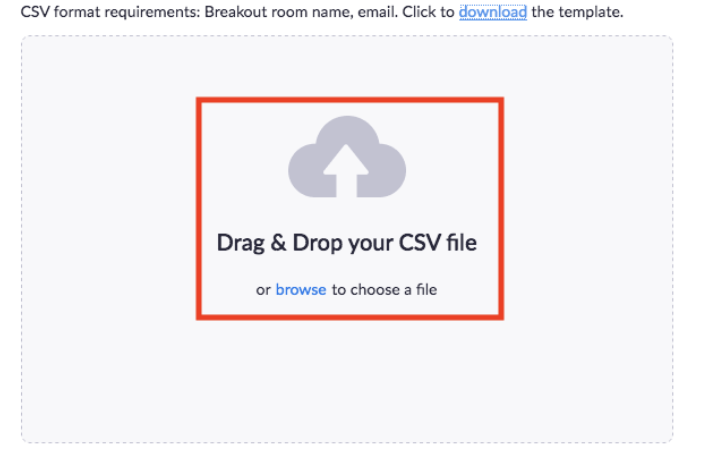
| You can use the Breakout Room menu within the Zoom website interface to further edit the imported rooms and user assignments. |
9. Make sure to select Save in the bottom right corner.
10. Click the Save button at the bottom of the general Meeting Settings edit page to save your changes to the Meeting as a whole.
Using Pre-Assigned Breakout Rooms in a Meeting
Once you have set Breakout Room pre-assignments for a Meeting, the Rooms will automatically be created when you start the Meeting. The Rooms will start out empty and will gradually be populated as assigned participants enter the meeting.
Students need to be signed in to their Brown Zoom account for the Breakout Room pre-assignment to work (brown.zoom.us), since their Brown email addresses are used when pre-assigning.
You are not locked into using the pre-assigned Breakout Rooms in your meeting. You can freely create and delete Breakout Rooms as well as change participant assignments using the Breakout Rooms menu within the Meeting Settings (for example to account for absences).
- Click the Breakout Rooms button on the bottom row of your Zoom Meeting interface to see your pre-made rooms.

- The Breakout Rooms menu should appear in a pop-up window. From here, you can create additional Rooms, delete rooms, and shift participants around your rooms in the same way you would manage Breakout Rooms created during the Meeting.
- If you wish to switch back to your default Breakout Room assignments, or empty all existing Breakout Rooms for re-assignment, then click the Recreate button in the bottom left of this menu.
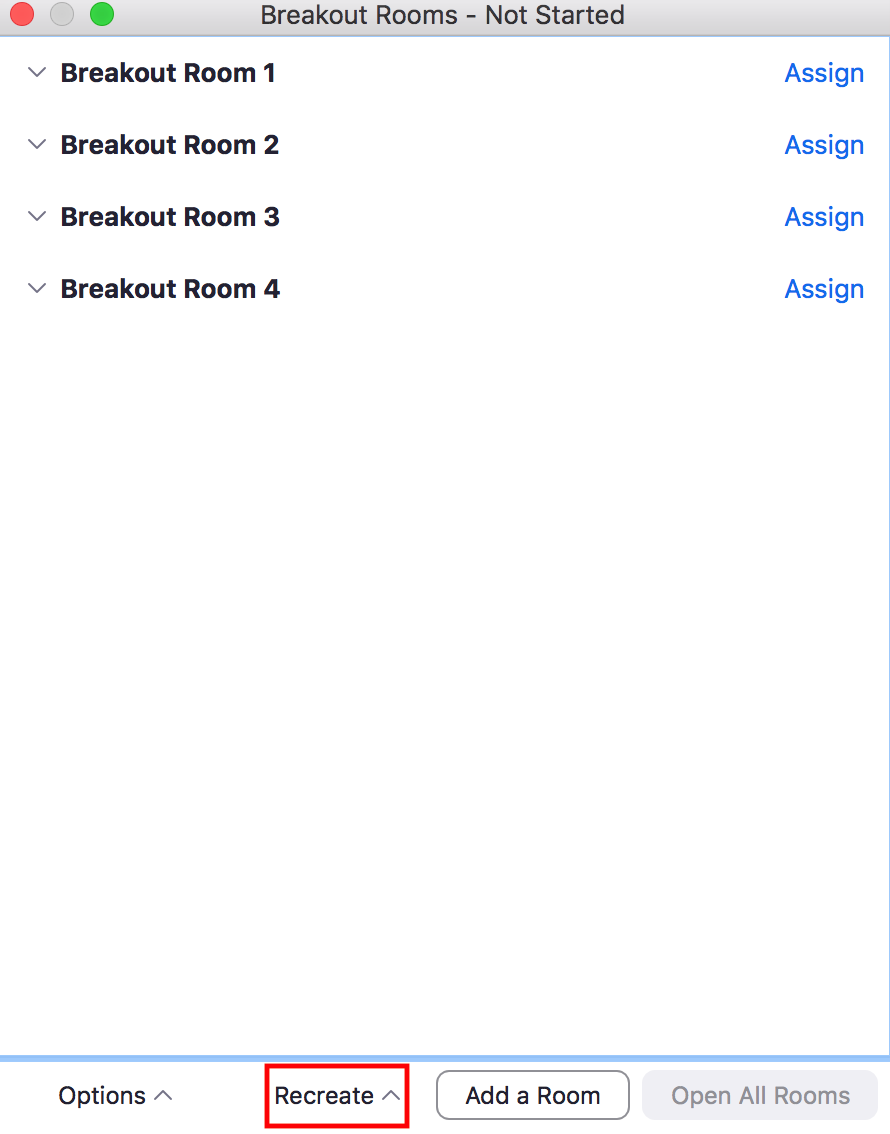
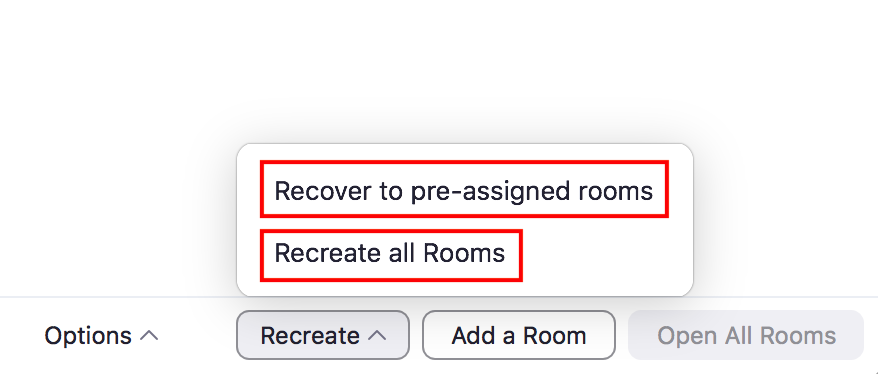
You can either default back to the pre-assignment Breakout Rooms and their participant assignments by clicking Recover to pre-assigned rooms, or empty all current Breakout Rooms by clicking Recreate all rooms.
| Note: Recreating all rooms will also change the Breakout Room names back to the default Breakout Room 1, Breakout Room 2, Breakout Room 3, etc., naming convention. |
Recording Breakout Rooms
We discourage recording breakout rooms unless it is for accessibility or a specific use case. Breakout sessions can only be recorded locally, which can easily be shared, creating privacy concerns.
Need Additional Information
Zoom's Breakout Room article can found on this page.
