

JSM : Alert Rules
Jira Service Management offers four contact methods that you can use for alert notifications:
- SMS
- Voice phone calls
- Mobile push notifications
Each member of your team can add or edit their contact methods anytime through their notifications page. Your email address is your default contact method.
Please Note - If you previously had an Opsgenie profile and plan on using a phone call as a notification, it is recommended to use the steps below to re-add your phone number.
Phone Notifications
The phone numbers that Jira would be calling you from are different from the numbers Opsgenie used.
There’s only a single vCard regardless of which region your account is set up. Jira Service Management generally uses the following phone numbers to send notifications. To view a full list that might be used for SMS and voice notifications, tap this link from your mobile device to download the vCard.
The Alert notifications tab
To access your alert notification preferences on a computer:
Access your settings by visiting https://brown.atlassian.net/jira/settings/personal/alert-notifications
Open the Alert notifications tab and define the following:
- Contact methods
- Notification rules
- Mute and quiet hours
- Notification forwarding rules
To access your alert notification settings on Jira Cloud mobile:
Select Profile settings on the navigation menu.
Open Notification settings and you’ll find the following:
- Contact methods
- Notification forwarding
- Mute
- Quiet hours
- Sounds
Bypass Do Not Disturb
Note: If you only want P1 alerts to notify you after hours, you will need to enable the setting below first.
On iOS, Critical Alerts
On Android, have the Jira Cloud app listed as an app to bypass Do Not Disturb.
The settings above can be found in our Get Started KB.
Alert Rules
You can configure when and how to receive your alert notifications. Create a rule for each of your contact methods by specifying when to receive the notifications. You can delay receiving notifications for up to 1 day. You can add multiple rules and enable or disable them at any time. Jira Service Management attempts each method in the order you specify, one by one, until it reaches the alert.
You can use the Alerts page to best fit your workflow. We’ll show off two examples below.
In example 1, you can set an Alert to make anything considered a P1 to notify you by your choice of notification method at any time. If you would like to set Start on web
New alert ![]() -> Edit -> Alerts matching at least one condition -> Priority equals P1 Critical -> Add Notification method
-> Edit -> Alerts matching at least one condition -> Priority equals P1 Critical -> Add Notification method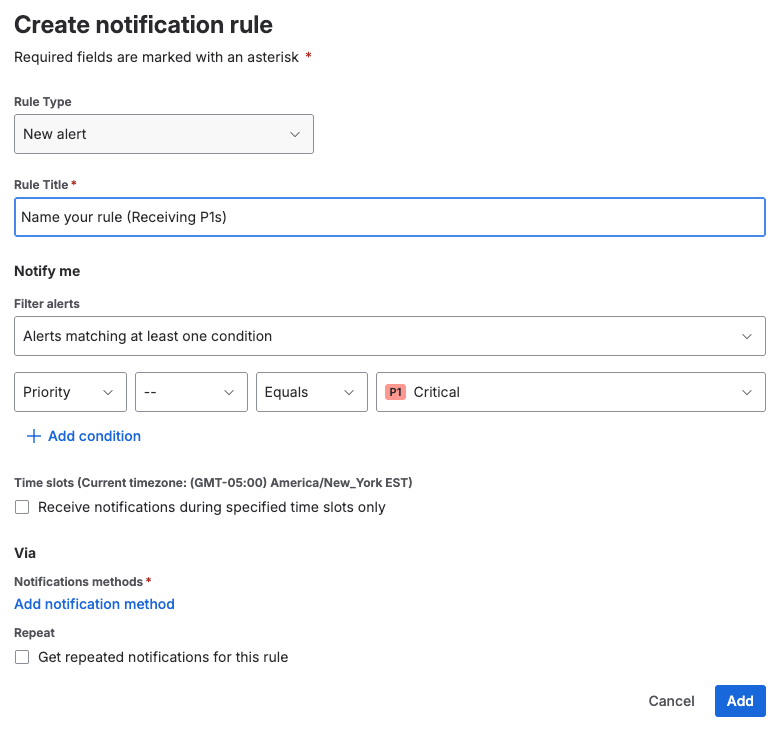
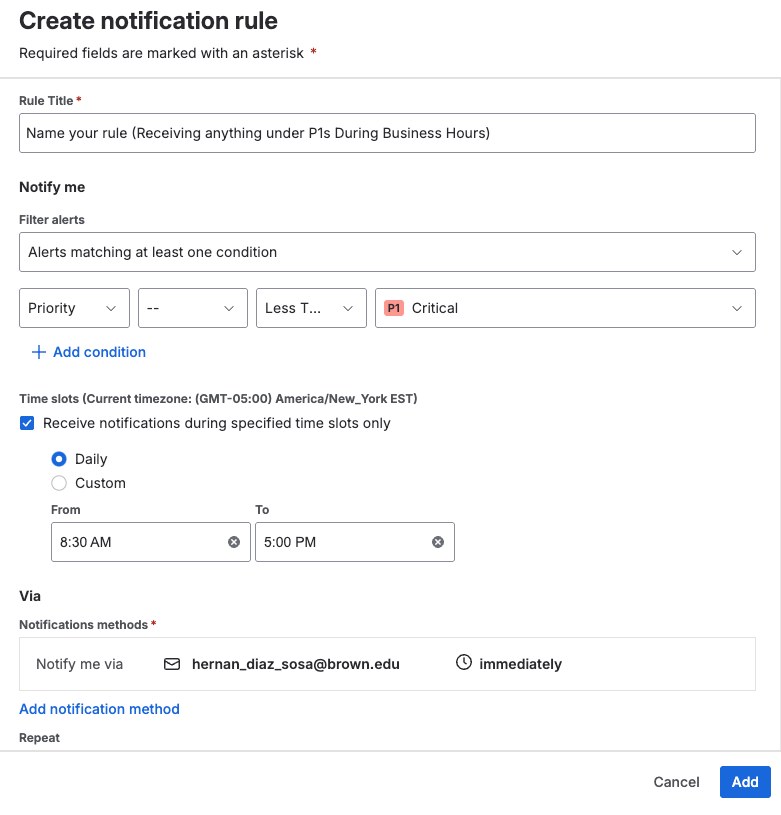
In Example two, if you would like to receive only emails or text messages for any priority below P1s during business hours, you can make an alert rule like the one below
New alert -> “Lower than P1” Priority not equals P1 -> Receive notifications during specified time slots only
My Alerts - Only view Alerts belonging to you and your team
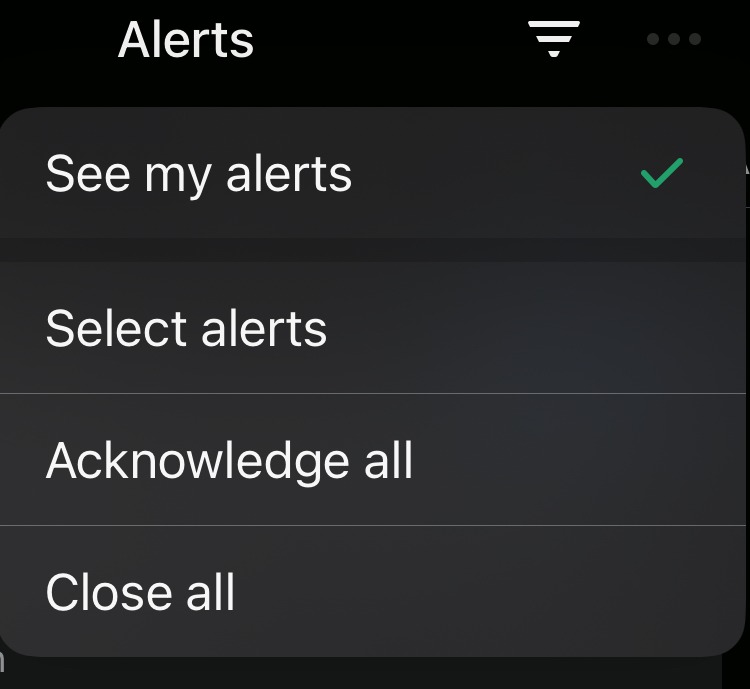
All of OIT can see each other's Alerts. However, there is a simple way only to view alerts needing your attention.
On the web, ensure the ![]() button is turned on. It is located on the top Right of the Alerts page. You can tell it is on if it is colored blue. On the mobile app you will need to click on the three dots and select the option “see my alerts”.
button is turned on. It is located on the top Right of the Alerts page. You can tell it is on if it is colored blue. On the mobile app you will need to click on the three dots and select the option “see my alerts”.
If you have any questions, please contact the Service Center by emailing [email protected]