

One of the many types of equipment the IT Service Center has available to borrow is the Sony α6300 mirrorless digital camera. The α6300 is a full-featured, professional still camera, and the number of settings and buttons may be overwhelming to someone unfamiliar with advanced photography equipment or specifically the Sony brand. This guide is meant to provide the basics for getting up and running with the α6300. If you would like a reference which covers all of the more advanced functions, the online help guide is available here, as well as a PDF of the full manual.
Supplied equipment
- Sony α6300 camera
- battery, USB cord and wall plug for charging
- neck strap
- remote shutter trigger
- SD card reader
- RØDE VideoMicro microphone
- furry wind shield
- camera cold shoe mount
- Aputure AL-M9 Amaran LED light
- colored gels
- USB cord
- camera cold shoe mount
The controls
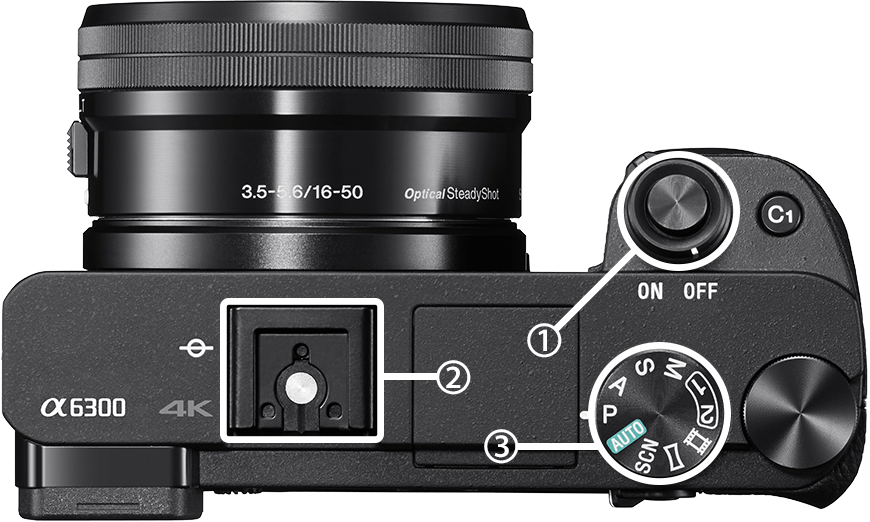
Top:
- ① power toggle and shutter button
- ② hot shoe
- ③ shooting mode
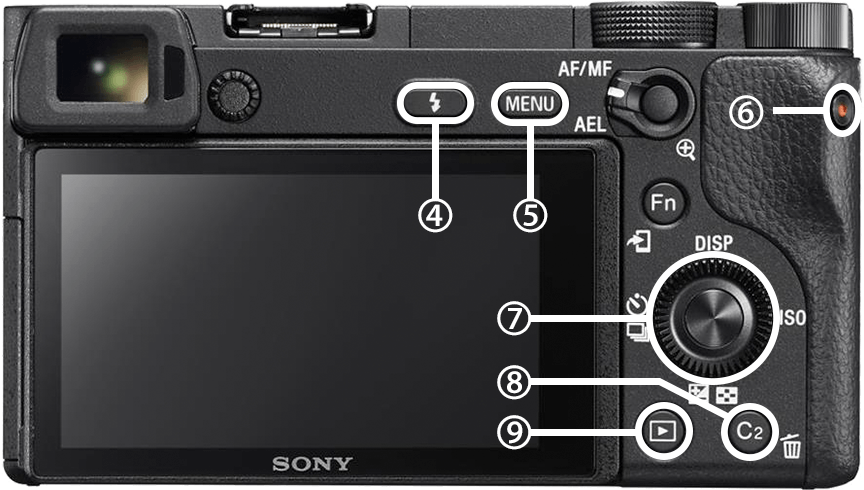
Back:
- ④ flash mode
- ⑤ menu button
- ⑥ record button
- ⑦ directional pad
- ⑧ trash button
- ⑨ playback button
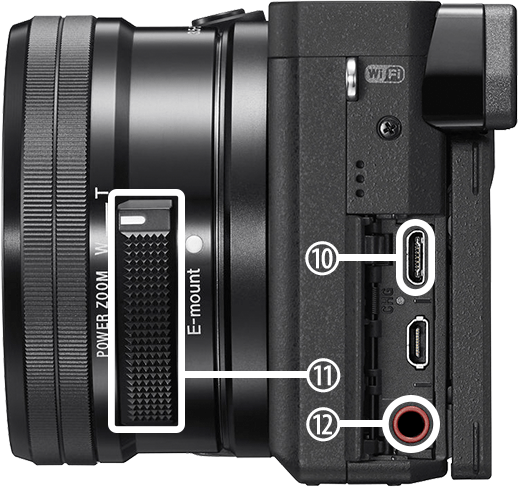
Left:
- ⑩ Micro-USB port
- ⑪ power zoom control
- ⑫ mic line in
Quick start guide
If you've used a dedicated digital camera, most of the controls on the α6300 will be familiar to you. Whether you have or not, though, this guide is meant to walk you through the basics as well as a couple common use cases for the equipment.
To start, remove the lens cap from the camera and store it safely in the camera case.
Then, to turn on the camera, turn the switch around the shutter button (①) with your finger to the ON position.
- If you simply want to take pictures or video and don't need manual control, rotate the mode dial (③) to AUTO. For information about manual control, see the Advanced Controls section.
- To zoom the lens in or out, either push the power zoom control (⑪) to the side, or rotate the zoom ring (just in front of the power zoom control) around the lens.
- To enable the in-camera flash, press the flash button (④). When you want to disable the flash or store the camera, push the flash back down carefully, so as not to damage the mechanism.
- If you want to look at a picture you took, press the playback button (⑨) and find the photo by rotating or pressing the directional pad (⑦) to the left and right. You can delete pictures with the Trash button (⑧).
- To take a picture, press the shutter button (①). When you begin to press down, the camera will attempt to focus on the subject, and then the picture will be taken when the button is fully depressed.
- To make a video recording, switch the mode dial (③) to the film icon. Press the record button (⑥) to start recording, and press it again to stop.
Advanced controls
If you would like to take advantage of the advanced controls offered by the α6300, here is a quick run-down of common variables you may wish to set manually.
- RAW file format — If you plan on editing your photos, shooting in RAW preserves more information and allows for greater flexibility, at the cost of much larger files. To enable RAW format, open the menu (⑤), select Quality (the third option on the very first page), and set it to RAW or RAW + JPEG.
- Shutter speed and aperture — When in one of the manual modes (P, A, S, or M), you can manually adjust shutter speed, aperture, or both. They can be set using the unlabeled dial to the right of the mode dial, and the circular "click wheel" control (⑦).
- ISO sensitivity — To set the sensitivity, click the right side of the directional pad (⑦) and select the desired value. Higher sensitivity allows for brighter photos without changing aperture or shutter speed, but at the cost of increased graininess.
- Manual focus — If you need to manually adjust the focus, set the focus switch (to the right of the menu button) to "AF/MF", hold the button, and rotate the lens ring.
Additional functionality
While not a DSLR, the α6300 is packed with functionality. In addition to the basics mentioned above, it has many other options and features not discussed in this quick guide. If you're interested to learn more about what the α6300 can do, access the online help guide or PDF manual, available for free.
Connecting to a computer
When you're ready to copy your pictures to a computer, remove the SD card and connect it to your computer:
- Slide the switch on the battery door to the "open" position.
- Push the SD card in to release it from the catch, then remove it.
- Using the supplied SD card reader, or your computer's built-in SD card slot if it has one, connect the card to your computer.
- Drag the pictures to your computer in the Finder (macOS) or Windows Explorer (Windows), or use a photo management program like Lightroom or Photos to import the pictures.
- Eject the drive from your computer and remove the card once it is safely ejected.
- Replace the SD card in the camera, taking care to orient it with the label facing toward the door flap, and push it in until it clicks.
- Close and lock the door flap.
Charging
The α6300 does not come with a separate battery charger; rather, the battery is charged by plugging the camera in to a USB power source (like you would charge a cell phone). Use the included USB power adapter and Micro-USB cord to connect the camera to power.
Using the optional accessories
The camera kit comes with some accessories which may be useful, especially for recording video.
RØDE VideoMicro microphone
To use the microphone with the camera, first attach the microphone mount to the camera: remove the protective cover from the shoe mount (②) and store it in the camera bag. Slide the holder into the mount and tighten the circular dial to secure it in place. The microphone can then be connected to the camera (port ⑫) using the red audio cord.
Aputure AL-M9 Amaran LED light
The LED light can be used as a light source, especially for video, when a flash is insufficient. Use the switch on the side to turn on the light, and adjust the brightness with the + and − buttons.
Camera mount
If not being used in conjunction with the microphone, the light can be mounted on the camera using the cold shoe mount.
- Remove the protective cover from the shoe mount (②) and store it in the camera bag.
- Slide the holder, found in the light's case, into the shoe mount. Tighten the black plastic dial to secure the mount.
- Orient the holder with the metal screw facing toward you and tighten the smaller black plastic dial to secure the holder position.
- Place the light into the holder and tighten the metal screw to secure it.
Filters
The light comes with three filters which can be used to adjust the light qualities as desired. To use one of these filters, remove the white plastic from the front of the light (it is held by magnets; simply pull to remove it). Align the filter in front of the LEDs, then replace the white plastic.
Charging
To charge the battery, use the USB cord supplied in the light case. Plug it in either to a computer or a USB wall adapter, such as the one included for charging the camera.
Support
If you need help with your Sony α6300, you can contact Sony here. Alternatively, if you have borrowed an α6300 from the Brown IT Service Center, we can also provide assistance using it; simply visit us on the fifth floor of J. Walter Wilson, call us at 401-863-4357, or chat us during our open hours using the button at the bottom right of this page.