Creating a separate staff vacation calendar for your group has many advantages:
- everyone can see, at a glance, when co-workers will be out
- staff vacation does not need to appear on a supervisor's, or other staff member's, calendar
- vacation can be approved by the supervisor
- the calendar view can be turned on and off as needed by all members of the group
Initial Setup
Create the Calendar
- Launch your calendar by clicking Calendar on the top of http://gmail.brown.edu.
- In the My Calendars section on the left, click Add
- Choose a name for the calendar (e.g. [Department Name] Vacation)
- In the "Share with Specific People" section, add your co-workers and supervisor.
- The supervisor should have "Make Changes and Manage Sharing" privileges
- Everyone else can simply have "See All Event Details" privileges
- Click the Create Calendar button at the bottom. Now, your calendar will appear in the "My Calendars" list
Add the Calendar Address as a Contact
These instructions are to be completed by anyone who plans to put vacation on the calendar.
- Find the calendar in your list of calendars. Unless you are the supervisor or the person who set up the calendar, it will probably be found under "Other Calendars".
- Click the arrow next to the calendar name and choose "Calendar Settings"
- Find the section labeled Calendar Address. Highlight and copy the text to the right of the words Calendar ID:. It should look something like brown.edu_example123example456fco@group.calendar.google.com
- Next, we will add this address as a contact. Go to your email contacts - if you are not sure how to get there you can simply visit https://mail.google.com/a/brown.edu/#contacts.
- Click the icon of a person with a plus sign to create a new contact.
- For the name, type "[Your Department or Group] Vacation Calendar
- For the email address, paste the text you copied earlier
- Save the contact
Supervisor / Approver: Set up Notifications
If the staff vacation dates are going to need approval, these instructions are to be completed by the supervisor(s) who plan to approve events on the calendar.
- Under My Calendars, click the dropdown arrow next to your new calendar name and choose Notifications
- Check these three boxes on this screen: New Invitations, Changed Invitations, Canceled Invitations. This will send you (the supervisor) an email whenever an employee is requesting or changing vacation time.
Using the Calendar
Staff - Adding/Requesting Vacation
These instructions to be completed by employees each time they would like to request vacation time.
- Add the vacation to your own calendar.
- Create an all day event on the date you will be out. Or, if you have a shorter appointment, create an event for those times.
- Include your name in the event name, for example, "Josiah C. Vacation". Do not include any more personal details about your time out.
- Change the event to "Show me as Busy" instead of available, so people trying to schedule an appointment with you will see that you are busy.
- In the Guests area on the right, start typing the name of the contact you created (e.g. [Your Department or Group] Vacation Calendar. When you see the contact appear, choose it.
- Save the event
- Your supervisor(s) will receive an email about your vacation request. They can either approve or decline the invitation. You will receive an email with their choice.
Supervisor(s) - Approving Vacation
If you (a supervisor) are going to be approving staff vacation dates, you should first follow the instructions above for setting up notifications. Then:
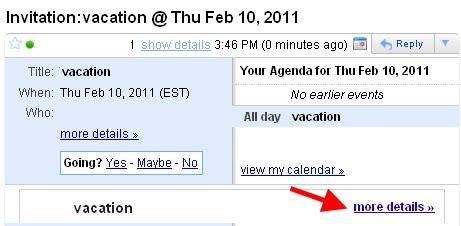
- When staff members add vacation dates to their calendars, they will invite the group vacation calendar, and you will receive an email with the request.
- Click "More Details" in the email to view the event

- At the top of the event, where it says "Going?", choose Yes. Click Save.

- You can also approve/decline vacation from the calendar. Every event with a question mark on the calendar has not yet been approved - you can click the question mark and make your choice.
Viewing the Calendar
- To toggle the calendar on or off, click its name in your list of calendars.
- To change the display color, click the arrow next to the calendar name and you will be presented with a choice of colors. Your color choice will only be displayed for you - when others view the calendar, they can make their own color choice.
