

- Request an Email Alias
- Google Groups or Shared Mailboxes can be requested through our ticket form under Account/Access Request.
Add the Address to Your Account
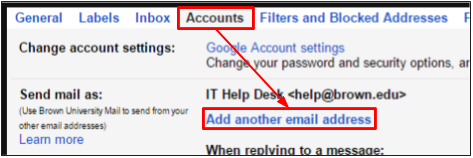
- After logging into your account, click Settings on the top right (the gear icon) and go to the Accounts tab
- Or you can click this direct link. Make sure you're signed in under your Brown Gmail account.
- In the first section ("Send mail as"), click "Add another email address you own."
- Enter the name information for your second account.
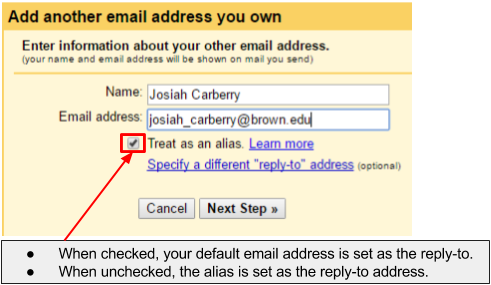
- Click Next Step. A verification email will be sent to your second account.
- Check your email at your second account (if you are adding an alias, the verification email will simply come to your main email account). You will have received an email asking you to confirm that you own this second address. Click the link in the email to confirm. The second address should now appear in the "Send mail as" section in settings in your main account.
Sending Options
Reply from Same Address Mail was Sent To
In the Accounts tab in your Settings, you can choose to always reply from the same address the mail was sent to. If you're a member of a group, this only applies if you've set up that group address as described in the first part of this document. In other words, if you want to automatically reply from a department group address used for incoming requests (e.g., [email protected]) but you are also in a Google Group used for an interest group (e.g., [email protected]), you can still use this setting - it will only affect the first group as long as you don't add the second as a sending address in your settings.
Manually Choose the Address
If you only occasionally plan to send new emails from the second address, you can choose it manually when composing an email. Click on your email address in the "From:" field and select the account you would like to send from.
Make the Address Your Default
Optional - you wouldn't want to do this with a departmental account, but you may want to with an alias.
- Under your Settings > Accounts, click the Make Default link next to the email address of your choice.
- In addition, below your list of Send Mail As addresses, you will see an option of what to do "When replying to a message". By default, your emails will appear to come from the address to which they were sent. If you would like all mail to come from your default address instead, you can change this setting. When sending individual emails, you will still be able to override the From address.
Related Google Article: Send mail from a different address or alias